
Summary
CenturyLink has a powerful REST API for automating the provisioning and management of virtual servers in their environment. And since PowerShell v4 now has cmdlets that support interacting with REST APIs, it is an easy way to work with entities in the CenturyLink Cloud. The following post will cover the steps required (and sample code) to use PowerShell to provision a CenturyLink Cloud virtual server. Plain old Internet connectivity is all that’s required between PowerShell and CenturyLink, since their API is on the open Internet. The complete reference to CenturyLink’s Cloud REST API can be found here: https://www.ctl.io/api-docs/v2/
Steps:
- Get a free account for CenturyLink Cloud here: https://www.centurylinkcloud.com/
- Get your Account Alias
- Get your Group ID (Default Group)
- Query for the capabilities of your desired datacenter (you can find a list of datacenters from the CenturyLink Cloud Control Portal here: https://control.ctl.io/)
- Create your server!
Note: All of these script samples are using PowerShell v4 (required)
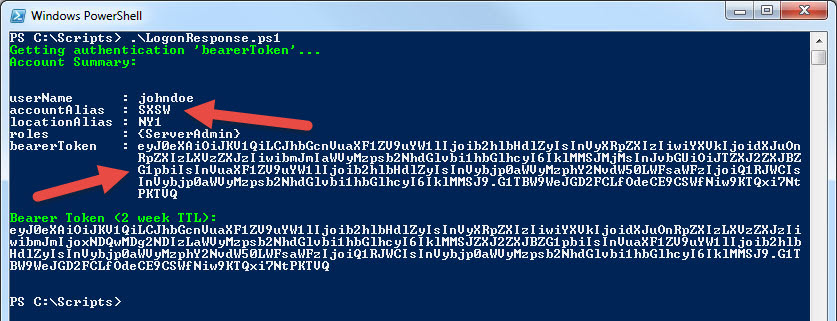
Get Your Account Alias
Once you get your CenturyLink account, you set your account alias to an abbreviation between 2 and 4 characters. You can also get your AccountAlias from the REST API logon response. You also need to get the BearerToken from the logon response to use as your authentication mechanism with communicating with the CenturyLink REST API (a bearer token has a life of 2 weeks, so don’t hard code it into your scripts).
Example: LogonResponse.ps1
if (!($psversiontable.PSVersion.Major -ge 4)) {
  Write-Host -ForegroundColor "red" "Requires PowerShell v.4 or greater. Please install the Windows Management Framework 4 or above."
  exit
}

$psCreds = Get-Credential -Message "Use CLC Web Portal Credentials"
$creds = @{
 username = $psCreds.username
 password = $psCreds.GetNetworkCredential().Password
}
$creds = $creds | ConvertTo-Json

$headers = New-Object "System.Collections.Generic.Dictionary[[String],[String]]"

Write-Host -ForegroundColor "green" "Getting authentication 'bearerToken'..."
$logonUrl = "https://api.ctl.io/v2/authentication/login"
$logonResponse = Invoke-RestMethod -Method Post -Headers $headers -Uri $logonUrl -Body $creds -ContentType "application/json" -SessionVariable "theSession"

Write-Host -ForegroundColor "green" "Account Summary:"
$logonResponse

Write-Host -ForegroundColor "green" "Bearer Token (2 week TTL):"
$logonResponse.bearerToken
Output:
Find the Default Group for Your Server
This example is going to use your account’s datacenter “Default Group” as the destination for your new server, specifically for the datacenter ‘CA3’ (in Calgary, Canada). Any group can be used, but your account will have a “Default Group” for each datacenter your account can access. This group ID is required in order to identify the destination for your new server.
Example: GetDefaultDatacenter.ps1
$psCreds = Get-Credential -Message "Use CLC Web Portal Credentials"
$creds = @{
 username = $psCreds.username
 password = $psCreds.GetNetworkCredential().Password
}
$creds = $creds | ConvertTo-Json

$headers = New-Object "System.Collections.Generic.Dictionary[[String],[String]]"

# Write-Host -ForegroundColor "green" "Getting authentication 'bearerToken'..."
$logonUrl = "https://api.ctl.io/v2/authentication/login"
$logonResponse = Invoke-RestMethod -Method Post -Headers $headers -Uri $logonUrl -Body $creds -ContentType "application/json" -SessionVariable "theSession"

$dataCenter = "CA3"
$bearerToken = " Bearer " + $logonResponse.bearerToken
$accountAlias = $logonResponse.accountAlias

$headers.Add("Authorization",$bearerToken)

Write-Host -ForegroundColor Green "Getting datacenter groups for $dataCenter..."
$requestURL = "https://api.ctl.io/v2/datacenters/$accountAlias/CA3?groupLinks=true"
$datacenterLinks = Invoke-RestMethod -Method GET -Headers $headers -Uri $requestURL -ContentType "application/json" -SessionVariable "theSession"
Write-Host "Available links:"
Write-Host $datacenterLinks.links

foreach ($link in $datacenterLinks.links) {
  if ($link.rel -eq "group") {
    Write-Host -ForegroundColor Green "Getting default datacenter group for group $($link.id)..."
    $requestURL = "https://api.ctl.io/v2/groups/$accountAlias/$($link.id)"
    $datacenterGroups = Invoke-RestMethod -Method GET -Headers $headers -Uri $requestURL -ContentType "application/json" -SessionVariable "theSession"
    foreach ($group in $datacenterGroups.Groups) {
      if ($group.type -eq "default") {
        Write-Host "Found group:"
        Write-Host $group
        Write-Host "`n"
        Write-Host -ForegroundColor Green "Default Group for $($dataCenter): $($group.id)"
      }
    }
  }
}
Output:

Query for the Capabilities of Your Desired Datacenter
You can also get a list of available datacenters through the API with the following URI: https://api.ctl.io/v2/datacenters/yourAccountAlias. For this example we’re going to query CA3 (Canada – Toronto). As of this writing, the list includes: CA1, CA2, CA3, DE1, GB1, GB3, IL1, NY1, SG1, UC1, UT1, VA1, WA1. You will want to select the desired platform for your virtual server from the datacenter’s available templates as well as the ID of your destination network. If you don’t have any networks yet, the easiest way to create on is to first deploy a virtual server through the Control Portal web site. This can also be created through the API, but for the sake of brevity, we’ll use a network that already exists.
Partial Example (using the results from logonResponse.ps1): Query the Datacenter
$bearerToken = " Bearer " + $logonResponse.bearerToken
$accountAlias = $logonResponse.accountAlias

$headers.Add("Authorization",$bearerToken)

Write-Host -ForegroundColor "green" "Getting datacenter capabilities for $dataCenter..."
$RequestURL = "https://api.ctl.io/v2/datacenters/$accountAlias/CA3/deploymentCapabilities"
$deployCapabilities = Invoke-RestMethod -Method GET -Headers $headers -Uri $RequestURL -ContentType "application/json" -SessionVariable "theSession"

Write-Host -ForegroundColor "green" "This datacenter supports the following platform templates:"
$deployCapabilities.templates

Write-Host -ForegroundColor "green" "This datacenter supports the following networks:"
$deployCapabilities.deployableNetworks
Output

Finally, Create Your Server
After gathering the destination group (default group for this example), provisioning template (sourceServerId) and the destination network, you can use the following script to create your virtual server in the CenturyLink Cloud.
Note: There is a character limitation for the ‘name’ field (6 I believe but this example uses a 4 character name).
Example: CreateServer.ps1
$server = @{
  name = "test"
  description = "My test server"
  groupId = "7c39b8a1aee32241979a282241979a28"
  sourceServerId = "WIN2012R2DTC-64"
  isManagedOS = "false"
  networkId = "7J3aCCm0GGF5ev4cmh6U58279b6f056a"
  password = "SomePassword!"
  cpu = 2
  memoryGB = 4
  type = "standard"
  storageType = "standard"
}
$server = $server | ConvertTo-Json

$psCreds = Get-Credential -Message "Use CLC Web Portal Credentials"
$creds = @{
 username = $psCreds.username
 password = $psCreds.GetNetworkCredential().Password
}
$creds = $creds | ConvertTo-Json

$headers = New-Object "System.Collections.Generic.Dictionary[[String],[String]]"

Write-Host -ForegroundColor "green" "Getting authentication 'bearerToken'..."
$logonUrl = "https://api.ctl.io/v2/authentication/login"
$logonResponse = Invoke-RestMethod -Method Post -Headers $headers -Uri $logonUrl -Body $creds -ContentType "application/json" -SessionVariable "theSession"

$bearerToken = " Bearer " + $logonResponse.bearerToken
$accountAlias = $logonResponse.accountAlias

$headers.Add("Authorization",$bearerToken)

Write-Host -ForegroundColor "green" "Sending Server build request..."
$requestURL = "https://api.ctl.io/v2/servers/$accountAlias"
$buildRequest = Invoke-RestMethod -Method POST -Headers $headers -Uri $requestURL -Body $server -ContentType "application/json" -SessionVariable "theSession"

Write-Host -ForegroundColor "green" "Request Output:"
Write-Host -ForegroundColor "green" "Server Name:"
$buildRequest.server
Write-Host -ForegroundColor "green" "Is Queued?"
$buildRequest.isQueued
Write-Host -ForegroundColor "green" "Queue Status Links:"
$buildRequest.links
Output

Enjoy!
