Download Azure WAF V2 Blocking Logs w/PowerShell

Summary: Downloading and viewings the blocking logs for the Azure Web Application Firewall (V2) is necessary to adjust the blocking rules for the WAF. Even when the WAF is in the default “discovery” mode, there still may be some default blocking behavior.

First, the Application Gateway which is hosting the WAF needs to be enabled to send its diagnostic logs to a Log Analytics Workspace in Azure. After creating the Log Analytics Workspace, enable the diagnostic log forwarding (this example is via the Azure Portal):

Select the logs and Log Analytics Workspace.

The following PowerShell script will download logs for the past 24hrs from the WAF’s Log Analytics Workspace and export a CSV of the results.

Get-WafLogs.ps1 (example):

<#
.DESCRIPTION
    Gets WAF Logs
.EXAMPLE
    PS >> .\Get-WafLogs.ps1
.NOTES
    AUTHORS: Otto Helweg
    LASTEDIT: March 7, 2021
    VERSION: 1.0.1
    POWERSHELL: Requires version 6
    Update Execution Policy and Modules:
        Set-ExecutionPolicy Bypass -Force
    Login to Azure first:
            Logout-AzAccount
            Login-AzAccount -Subscription "<Subscription Name>"
            Select-AzSubscription -Subscription "<Subscription Name>"
    Example:
        .\Get-WafLogs.ps1 -workspaceName <Workspace Name> -workspaceRG <Resource Group Name>
#>

param($workspaceName,$workspaceRG)

if (!($workspaceName)) {
    $workspaceName = Read-Host "Workspace Name"
}

if (!($workspaceRG)) {
    $workspaceRG = Read-Host "Resource Group Name"
}

$WorkspaceID = (Get-AzOperationalInsightsWorkspace -Name $workspaceName -ResourceGroupName $workspaceRG).CustomerID
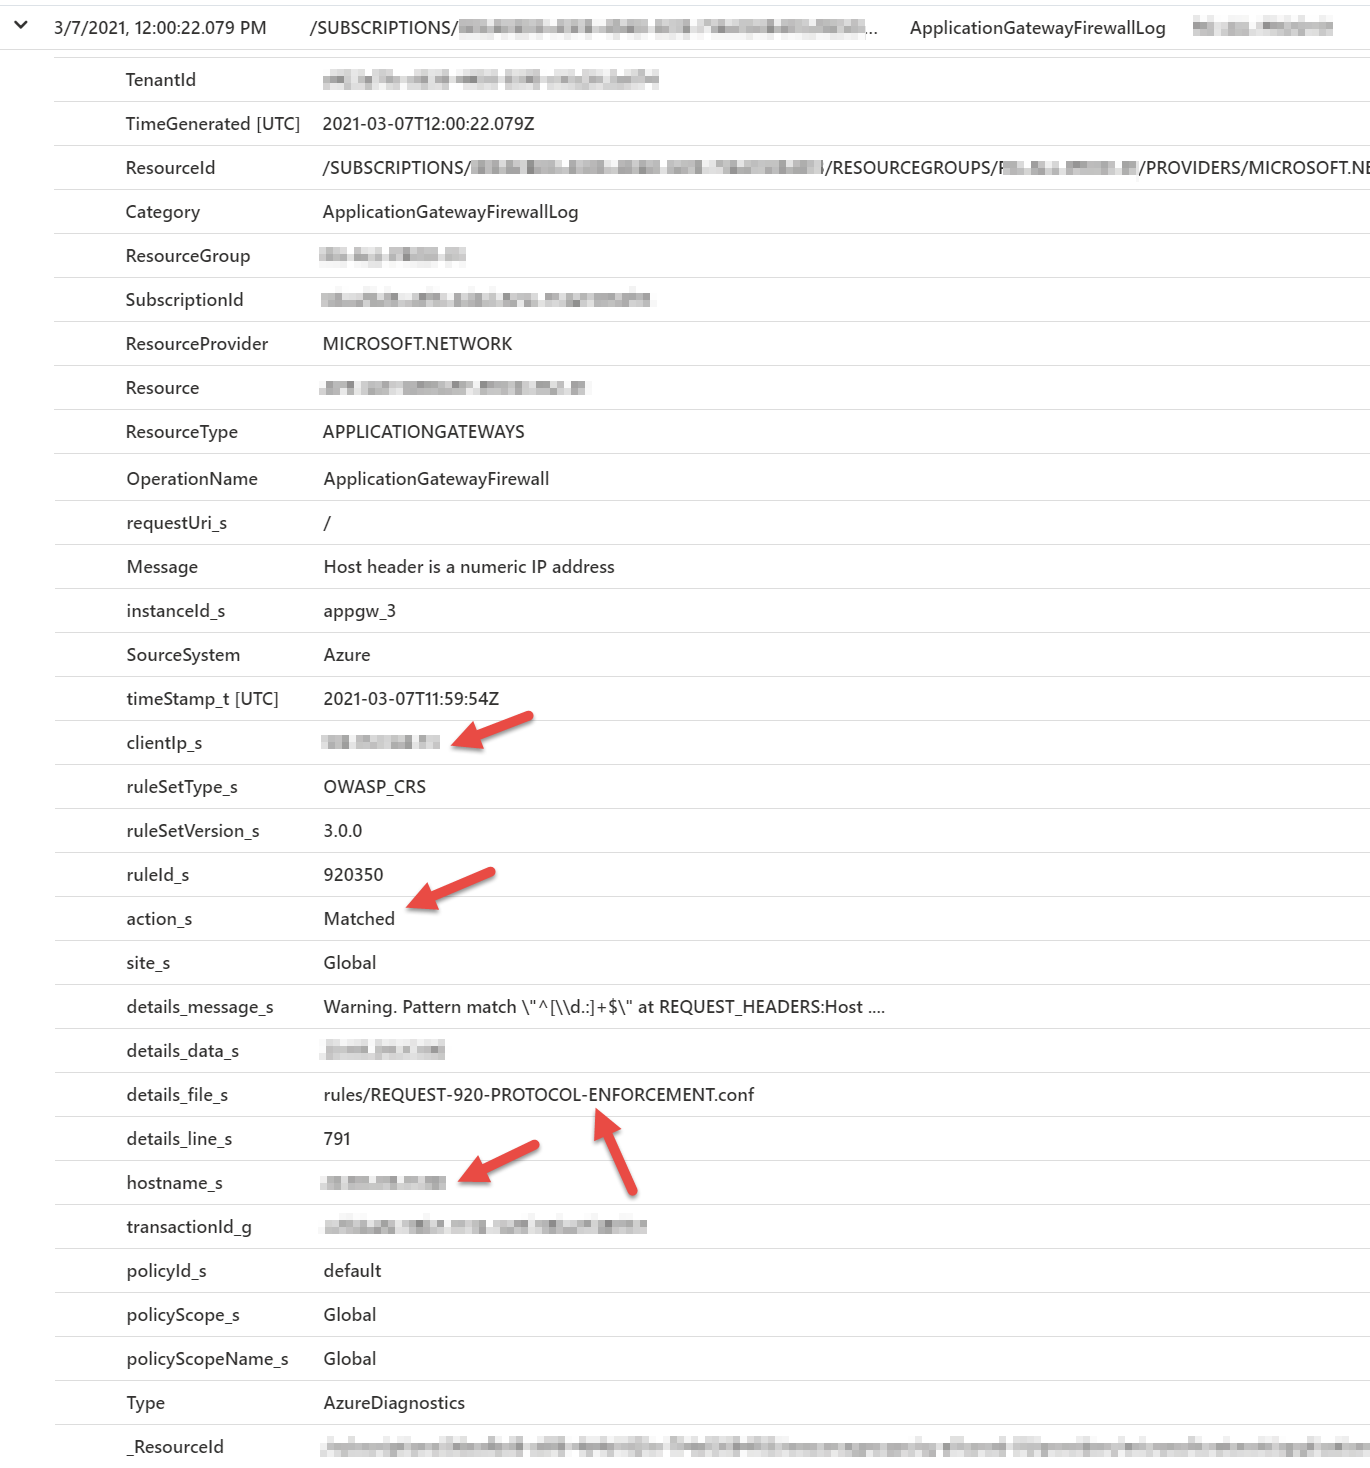
$query = 'AzureDiagnostics | where ResourceProvider == "MICROSOFT.NETWORK" and Category == "ApplicationGatewayFirewallLog"'

$results = Invoke-AzOperationalInsightsQuery -WorkspaceId $WorkspaceID -Query $query -Timespan (New-TimeSpan -days 1)

# $results.results | export-csv c:\temp\LogAnalyticsLogs.csv -Delimiter "," -NoTypeInformation

$csvOutput = @()
foreach ($result in $results.Results) {
    $rule = ""
    $uri = ""

    if ($result.details_file_s) {
        $rule = (($result.details_file_s).Split("/")[1]).Split(".")[0]
    } else {
        $rule = "N/A"
    }

    $uri = "$($result.hostname_s)$($result.requestUri_s)"
    $timeStamp = Get-Date $result.TimeGenerated -Format "dd/MM/yyyy HH:mm:ss"

    # Write-Output "$timeStamp,$($result.clientIp_s),$uri,$($result.action_s),$($result.ruleSetType_s),$($result.ruleId_s),$rule,$($result.Message)"
    Write-Host "." -NoNewline

    $csvOutputItem = New-Object -Type PSObject -Property @{
        TimeStamp = $timeStamp
        ClientIP = $result.clientIp_s
        URI = $uri
        Action = $result.action_s
        RuleSet = $result.ruleSetType_s
        RuleID = $result.ruleId_s
        RuleName = $rule
        Message = $result.Message
    } | Select-Object TimeStamp,ClientIP,URI,Action,RuleSet,RuleID,RuleName,Message
    $csvOutput += $csvOutputItem
}

Write-Output ""

$csvFileName = "$((Get-Date).Year)$((Get-Date).Month.ToString('00'))$((Get-Date).Day.ToString('00'))$((Get-Date).Hour.ToString('00'))$((Get-Date).Minute.ToString('00'))$((Get-Date).Second.ToString('00'))-WAFLogs.csv"
Write-Output "Exporting to file .\$csvFileName"
$csvOutput | Export-Csv -Path .\$csvFileName -NoType

The output (formatted in Excel) shows the WAF logs based on which rule and action were applied. These logs can be used to fine tune the rules used when the WAF is in ‘blocking’ mode as well as viewing the actions taken by the WAF while in ‘discovery’ mode.

Enjoy!

Add Network Security Rules to Azure NSGs w/PowerShell

Summary: This script will add specific Network Security Group Rules to Azure Network Security Groups in an Azure Subscription. This script requires a CSV input file with the following format:

NSG Name,Rule Name,Priority,Action,Protocol,Direction,Source IP,Source Port,Destination IP,Destination Port

Note: This script does not overwrite existing Rules and will skip an NSG if that rule name or priority is already set within an NSG. In addition, this script does not check to see if any preceding rules will block the new rule.

Set-NSGs.csv (example):

nsg-vnet-otto-test-ws2-01,Allow_Test_Inbound_1,500,Allow,TCP,Inbound,10.10.10.10,8080,172.198.1.1,3389

Set-NSGs.ps1 (example):

<#
.DESCRIPTION
    Sets NSG Rules for Network Security Groups
.EXAMPLE
    PS >> .\Set-NSGs.ps1
.NOTES
    AUTHORS: Otto Helweg
    LASTEDIT: February 9, 2021
    VERSION: 1.0.0
    POWERSHELL: Requires version 6
    Update Execution Policy and Modules:
        Set-ExecutionPolicy Bypass -Force
    Login to Azure first:
            Logout-AzAccount
            Login-AzAccount -Subscription "<Azure Subscription>"
            Select-AzSubscription -Subscription "<Azure Subscription>"
    Example:
        .\Set-NSGs.ps1 -Wait -inputFile "Set-NSGs.csv"
#>

param($inputFile)

if (!($inputFile)) {
    $inputFile = "Set-NSGs.csv"
}

$csvContent = Get-Content "./$inputFile"
foreach ($item in $csvContent) {
    $duplicateRule = $false
    $nsgName,$ruleName,$priority,$access,$protocol,$direction,$sourcePrefix,$sourcePort,$destinationPrefix,$destinationPort = $item.Split(",")

    Write-Output "Working on Rule: $nsgName - $ruleName"
    $nsg = Get-AzNetworkSecurityGroup -Name $nsgName

    foreach ($rule in $nsg.SecurityRules) {
        if (($rule.Name -eq $ruleName) -or (($rule.Direction -eq $direction) -and ($rule.Priority -eq $priority))) {
            Write-Output ">> Duplicate Rule Found! Check $ruleName, $direction and $priority"
            $duplicateRule = $true
        }
    }

    if ($duplicateRule -eq $false) {
        Write-Output "> Creating new NSG Rule"

        # Add the inbound security rule.
        $nsg | Add-AzNetworkSecurityRuleConfig -Name $ruleName -Description "Added by PowerShell" -Access $access `
            -Protocol $protocol -Direction $direction -Priority $priority -SourceAddressPrefix $sourcePrefix -SourcePortRange $sourcePort `
            -DestinationAddressPrefix $destinationPrefix -DestinationPortRange $destinationPort

        # Update the NSG.
        $nsg | Set-AzNetworkSecurityGroup
    }
}

Enjoy!

View Azure WAF V2 Blocking Logs

Summary: Azure WAF Blocking Logs can be viewed via a KQL Query in the Azure Portal Log Analytics Workspace. The Application Gateway hosting the WAF must be configured to forward logs to the Log Analytics Workspace (see Diagnostic Settings for the Application Gateway in the Portal).

The following query is used to grab blocking WAF logs:

AzureDiagnostics
| where ResourceProvider == "MICROSOFT.NETWORK" and Category == "ApplicationGatewayFirewallLog"

Run this query in the Azure Portal.

Expanding a log entry will show the Source IP, Destination Host IP, Rule Name, and Rule Action.

These logs can be exported to a CSV file and imported into Excel for further review.

Enjoy!

Add Azure VM Tags w/PowerShell

Summary: PowerShell can easily update or add tags to all VMs within an Azure Subscription. The following will only add or update tags, not remove existing tags. This script requires a CSV input file with the following format:

VM Name,Tag:Value,Tag:Value,Tag:Value,...

This script will break if there are any commas or colons in the Tag Name or Tag Value since they are used to parse the input file. The script can be updated to adjust delimiter handling.

Set-VMTags.csv (example):

xbogus,BuiltBy:otto.helweg@cloudrobots.net,Application:Test,AppOwner:otto.helweg@cloudrobots.net,Account:123456
otto-test-linux,Owner:otto,needed-until-date:2020-12-31,environment:test
otto-test-linux-2,Owner:otto,needed-until-date:2020-12-31,environment:test
otto-test-win,Owner:otto,needed-until-date:2020-12-31,environment:test
otto-dev-win10,Owner:otto,needed-until-date:2021-12-31,environment:dev
Otto-MyWindows,Owner:otto,needed-until-date:2021-12-31,environment:dev

Tags are then applied to the VM instance, and the associated Disks and NICs (associated Public IPs (PIPs) are not included.

Set-VMTags.ps1 (example):

<#
.DESCRIPTION
    Set tags for all VMs in a subscription
.EXAMPLE
    PS >> .\Set-VMMTags.ps1
.NOTES
    AUTHORS: Otto Helweg
    LASTEDIT:September 2, 2020
    VERSION: 1.0.3
    POWERSHELL: Requires version 6
    Update Execution Policy and Modules:
        Set-ExecutionPolicy Bypass -Force
    Login to Azure first:
            Logout-AzAccount
            Login-AzAccount -Subscription "<Azure Subscription>"
            Select-AzSubscription -Subscription "<Azure Subscription>"
    Example:
        .\Set-VMTags.ps1 -Wait -inputFile "Set-VMTags.csv"
#>

param($inputFile)

if (!($inputFile)) {
    $inputFile = "Set-VMTags.csv"
}

$csvContent = Get-Content "./$inputFile"
$vmList = @{}
foreach ($item in $csvContent) {
    $tags = @{}
    $vmName,$vmTags = $item.Split(",")
    if ($vmName -and $vmTags) {
        $vmList[$vmName] = $vmTags
        foreach ($tag in $vmTags) {
            $tagData = $tag.Split(":")
            $tags[$tagData[0]] = $tagData[1]
        }

        $vmAzure = Get-AzVM -Name "$vmName"

        if ($vmAzure) {
            Write-Output "$vmName VM updating Tags"
            Update-AzTag -ResourceId $vmAzure.Id -Operation Merge -Tag $tags
            foreach ($nic in $vmAzure.NetworkProfile.NetworkInterfaces) {
                Write-Output "> $vmName NIC updating Tags"
                Update-AzTag -ResourceId $nic.Id -Operation Merge -Tag $tags
            }
            if ($vmAzure.StorageProfile.OsDisk.ManagedDisk.Id) {
                Write-Output "> $vmName Disk $($vmAzure.StorageProfile.OsDisk.Name) updating Tags"
                Update-AzTag -ResourceId $vmAzure.StorageProfile.OsDisk.ManagedDisk.Id -Operation Merge -Tag $tags
            }
            foreach ($disk in $vmAzure.StorageProfile.DataDisks) {
                Write-Output "> $vmName Disk $($disk.Name) updating Tags"
                $azResource = Get-AzResource -Name "$($disk.Name)"
                Update-AzTag -ResourceId $azResource.Id -Operation Merge -Tag $tags
            }

            if ($Args -contains "-Wait") {
                Read-Host "Press Enter to continue"
            }
        } else {
            Write-Output "$vmName VM not found"
        }
    } else {
        Write-Output "Malformed tags"
    }
}

Enjoy!

Integrate Jenkins, Hashicorp Vault, and PowerShell

Summary: Passwords, Secrets, and Credentials, stored in a Hashicorp Vault server, can easily be leveraged by Jenkins Projects (including projects that leverage PowerShell for the automation – or pure Microsoft shops). There is a common tension between automation and security and this example will show how they can co-exist.

The following steps are used to enable this automation:

  • Save a Vault access token as a Jenkins Credential
  • Bind the Jenkins Credential to a Jenkins Project
  • Access the Jenkins Secret as an environment variable from PowerShell
  • Run a Jenkins Project (PowerShell) that loads all of the Vault Secrets for the project

When a credential is stored in Jenkins, it is encrypted and the credential secret value cannot be viewed after the fact, outside of a Jenkins project. When the credential is bound to a Jenkins project, it is loaded as an Environment Variable when the project is executed and can be accessed by the automation (PowerShell) in the manner. If the credential or secret is exposed in the StdOut of the automation, Jenkins will mask the credential value when it logs the output (see below).

Step 1: Add the Credential (Vault Secret)

From the Jenkins home, select Credentials, hover over the down arrow next to the domain “(global)”, and select “Add credentials”.

Jenkins-Add-Creds

Step 2: Add the Credential (Vault Secret)

Add the credential as a “Secret text” item.

Jenkins-Add-Creds-2

Step 3: Bind the Credential to the Project

Bind the credential (Vault Secret) to the Jenkins Project.

Jenkns-Bind-Secret

Step 4: Reference the Credential in PowerShell

Reference the Jenkins Secret via an environmental variable within the PowerShell automation.


Jenkins-PowerShell

The following PowerShell script is an example which will download and list all Vault Secrets within a particular path. Of course displaying secrets used during automation is not advisable, but serve as an example and launching point for using them in code.

Pull-Vault.ps1 (example):

# Version:: 0.1.5 (3/16/2017)
# Script Description:: Pulls Vault secrets into environmental variables.
#
# Author(s):: Otto Helweg
#
param($token,$vaultSvr,$path)

# Display help
if ($Args -match "-\?|--\?|-help|--help|/\?|/help") {
  Write-Host "Usage: Pull-Vault.ps1"
  Write-Host "     -path [path to credentials]             Path the list of credentials."
  Write-Host "     -token [Vault auth token]               Authentication token for accesing the Vault server."
  Write-Host "     -vaultSvr [Vault server name or IP]     Vault server name or IP address."
  Write-Host ""
  Write-Host "Examples:"
  Write-Host "     Pull-Vault.ps1 -token '770da5b6-eff1-6fd6-f074-1e2604987340'"
  Write-Host "     Pull-Vault.ps1 -token '770da5b6-eff1-6fd6-f074-1e2604987340' -vaultSvr '10.102.76.4'"
  Write-Host ""
  exit
}

if (!($env:VAULT_TOKEN) -or !($env:VAULT_ADDR)) {
  if (!($token)) {
    $token = Read-Host -Prompt "Enter Token for Vault authentication" -AsSecureString
    $token = (New-Object PSCredential "token",$token).GetNetworkCredential().Password
  }

  if (!($vaultSvr)) {
    $vaultSvr = Read-Host -Prompt "Enter Vault Server"
  }

  $env:VAULT_ADDR = "http://$($vaultSvr):8200"
  $env:VAULT_TOKEN = $token
}

if (!($path)) {
  $path = Read-Host -Prompt "Enter Secrets Path"
}

$keys = vault list -format=json $path | ConvertFrom-Json

foreach ($key in $keys) {
  $vaultKey = "TF_VAR_$key"
  $value = vault read -format=json "$($path)/$($key)" | ConvertFrom-Json
  if ($Args -contains "-debug") {
    Write-Host "  $($path)/$($key) : $($value.data.value)"
  }
  Write-Host "Loading env var: $vaultKey"
  Set-Item -path "env:$vaultKey" -value "$($value.data.value)"
}

Note: The output from the Jenkins Project will mask out any output that matches the Jenkins Secret.

...
VAULT_ADDR http://10.10.10.10:8200 
VAULT_ROOT_TOKEN **** 
VAULT_TOKEN **** 
windir C:\Windows 
WINSW_EXECUTABLE C:\Program Files (x86)
...

Enjoy!

Using JSON with Terraform

Summary: When using Terraform with PowerShell (or other scripting languages/applications), it’s helpful to have a single ‘source of record’ for the data or variables that drive the automation.  In this case we’re using modules to store global variables used across multiple Terraform plans. These global variables are consumed and used by Terraform as well as PowerShell. Terraform has the capability of using 2 different file formats for their modules (Hashicorp Configuration Language – HCL, and JSON). Although HCL is more human readable and editable, JSON is easier to consume by languages and applications outside of Hashicorp.

json-terraform

There is scant documentation about proper JSON formatting expected by Terraform as well as standard ways for PowerShell to consume the JSON files. Some formatting and scripting examples will be shown in this post.

\modules\variables\main.tf.json (example):

{
  "output": {
    "server_location": {
      "value": "East US"
    },
    "azurerm_resource_group": {
      "value": "RG-Terraform-East"
    },
    "subscription_id": {
      "value": "some-azure-subscription-id"
    },
    "tenant_id": {
      "value": "some-azure-tenant-id"
    },
    "domain": {
      "value": "dev.somedomain.com"
    },
    "remote_resource_group_name": {
      "value": "tf-environment"
    },
    "remote_container_share": {
      "value": "\\\\somshare.file.core.windows.net\\files"
    },
    "server_ip": {
        "value": "${lookup(var.server_ips,var.var_server_name)}"
    }
  },
  "variable": {
    "var_server_name": {},
    "server_ips": {
      "description": "Map of all server static ip addresses",
      "type": "map",
      "default": {
        "tstsqlsvr01": "10.10.10.101",
        "tstshrpntsvr02": "10.10.10.102",
        "tstisssvr03": "10.10.10.103",
        "tstiissvr04": "10.10.10.104",
        "tstiissvr05": "10.10.10.105"
      }
    }
  }
}

Note: The above example demonstrates the use of standard variables as well as an array using the ‘lookup’ method.

The following Terraform plan snippet, demonstrates referencing the module for its global variables.

Terraform Example:

module "variables" {
  source = "./modules/variables"
  var_server_name = "tstiissvr05"
}

provider "azurerm" {
  subscription_id = "${module.variables.subscription_id}"
  client_id       = "some-client-id"
  client_secret   = "some-client-secret"
  tenant_id       = "${module.variables.tenant_id}"
}

The following PowerShell snippet uses the ConvertFrom-Json cmdlet to read the JSON file as well as processing the resulting PowerShell object to extract the data into either variables or hashes.

PowerShell Example:

# Reads a Terraform JSON module and populates variables/hashes
$terraformVars = Get-Content ".\modules\variables\main.tf.json" | ConvertFrom-Json
$serverIPs = @{}
foreach ($item in $terraformVars.variable.server_ips.default.PsObject.Members | ?{ $_.MemberType -eq 'NoteProperty'}) {
  $serverIPs[$item.Name] = $item.Value
}

Write-Host "Tenant ID: $terraformVars.output.tenant_id.value"

Enjoy!


Multi Hop Windows Remote Management

Summary: There are cases where it’s necessary to use Windows Remote Management (WinRM), also known as WS-Management (WS-Man) to automate Windows Servers (especially Windows Server that are behind a Windows hop server). This is handy when there is no direct network access to the Windows server that need to be reached (typically for security reasons).

In this example, the following command is executed on the ThirdServer (through the FirstServer and then the SecondServer) in order to update a firewall rule to allow the WinRM service to respond to any source computer request (rather than just the local subnet).

Set-NetFirewallRule -Name WINRM-HTTP-In-TCP-PUBLIC -Action "Allow" -Direction "Inbound" -RemoteAddress "Any"

The default configuration for the WinRM firewall rule in Windows Server 2012+ is to only allow WinRM requests that originate from the local subnet of that server. This command changes a firewall rule to open WinRM to respond to requests from any source IP address.

multihopwinrm1

In addition, for environments that require multi-hop access over and to Windows Servers, RDP can be problematic if there are any network bandwidth or latency issues. For actions that don’t require access to the Windows desktop, WinRM is ideal since it is much more efficient and faster.

Note: The authentication token for the session on the ThirdServer may be reduced compared to the access available for the FirstServer. Specifically for access to external resources like network shares. 

MultiHop-ConfigWinRm.ps1

# Version:: 0.1.0 (1/13/2016)
# Script Description:: Expands WinRM scope.
#
# Author(s):: Otto Helweg
#

Write-Host "Configuring WinRM for remote access..."
# Get the necessary credentials for WinRM (usually Administrator level creds)
$creds = Get-Credential
$serverName = "FirstServer"
$secondServerName = "SecondServer"
$thirdServerName = "ThirdServer"

Write-Host "Running command from $serverName"
Invoke-Command -ComputerName $serverName -Credential $creds -ScriptBlock {
  param($secondServerName,$thirdServerName,$creds)
  Write-Host "Running command from $secondServerName"
  Invoke-Command -ComputerName $secondServerName -Credential $creds -ScriptBlock {
    param($thirdServerName,$creds)
    Write-Host "Running command from $thirdServerName"
    Invoke-Command -ComputerName $thirdServerName -Credential $creds -ScriptBlock {
      Set-NetFirewallRule -Name WINRM-HTTP-In-TCP-PUBLIC -Action "Allow" -Direction "Inbound" -RemoteAddress "Any"
    }
  } -ArgumentList $thirdServerName,$creds
} -ArgumentList $secondServerName,$thirdServerName,$creds

Note: The username for the credentials, needs to include the domain or server prefix. If this is a local account, use the ‘local\’ prefix. Therefore a local ‘Administrator’ account should be entered as ‘local\Administrator’.

Enjoy!

Server QA Testing With Pester

Summary: Pester is a PowerShell spin on unit testing (much like ServerSpec) on and for Windows. This example will demonstrate using Pester to test a remote Windows server where the scenario is verifying the quality of a freshly provisioned Windows server. Pester is used to check various settings on this new server that generally verify that the provisioning automation did the right thing.

More information and source code is available at the Pester Git repository here: https://github.com/pester/Pester

The following steps are performed when testing a server:

  1. Pester PowerShell module is downloaded to the remote server and loaded
  2. Pester tests are uploaded to the remote server
  3. PowerShell Pester test functions are uploaded to the remote server
  4. Pester test suite is executed on the remote server and the results are displayed
  5. All Pester tests and modules are removed from the remote server

The following files are used for this automation:

  1. PowerShell control script that automates the tests on a remote server and manages downloading/uploading the necessary files: Test-Server.ps1
  2. Pester test suite that contains a list of the tests to be performed: Azure.tests.ps1
  3. PowerShell functions that perform the Pester tests: Pester-TestFunctions.ps1

Note: The test script specifically breaks out the Windows Update test since it can take a while to perform. PowerShell logic is used in order to determine whether or not this test is performed.

Test-Server.ps1

# Version:: 0.1.5 (12/19/2016)
# Script Description:: Configures a server for a specific customer.
#
# Author(s):: Otto Helweg
#

param($serverName)

# Display help
if (($Args -match "-\?|--\?|-help|--help|/\?|/help") -or (!($serverName))) {
  Write-Host "Usage: Test-Server.ps1"
  Write-Host "     -serverName [server name or ip]    (required) Specify a specific server"
  Write-Host "     -u                                 Also test for no updates available"
  Write-Host ""
  Write-Host "Examples:"
  Write-Host "     Test-Server.ps1 -serverName server01 -u"
  Write-Host ""
  exit
}

# Create PowerShell Remoting access creds
$username = "someUser"
$password = "somePassword"

$securePassword = ConvertTo-SecureString -String $password -AsPlainText -Force
$psCreds = new-object -typename System.Management.Automation.PSCredential -argumentlist $username, $securePassword

if ($limit -eq "none") {
  $limit = $false
} elseif ($limit) {
  $limit = $limit.Split(",")
}

Write-Host "Working on $serverName"
if ($Args -contains "-u"){
  $tests = "updates,"
} else {
  $tests = ""
}

$output = Invoke-Command -ComputerName $serverName -Credential $psCreds -ScriptBlock { Test-Path "c:\PESTER" }

if (!($output)) {
  $output = Invoke-Command -ComputerName $serverName -Credential $psCreds -ScriptBlock { New-Item -Type Directory "c:\PESTER" -Force }
}

# Set execution policy to allow for running scripts
$execPolicy = Invoke-Command -ComputerName $serverName -Credential $psCreds -ScriptBlock { Get-ExecutionPolicy }
if ($execPolicy -ne "Unrestricted") {
  Write-Host "Temporarily modifying script execution policy"
  Invoke-Command -ComputerName $serverName -Credential $psCreds -ScriptBlock { Set-ExecutionPolicy Unrestricted -Force }
  $policyChanged = $true
}

Invoke-Command -ComputerName $serverName -Credential $psCreds -ScriptBlock {
  New-Item -Type Directory 'C:\PESTER\' -Force
  $Destination = 'C:\PESTER\Pester-master.zip'
  $Source = 'https://github.com/pester/Pester/archive/master.zip'
  $client = new-object System.Net.WebClient
  $client.DownloadFile($Source, $Destination)

  $shell = new-object -com shell.application
  $zip = $shell.NameSpace('C:\PESTER\Pester-master.zip')
  foreach($item in $zip.items()) {
    $shell.Namespace('C:\PESTER').copyhere($item)
  }
}

$filesToTransfer = @("azure.Tests.ps1","Pester-TestFunctions.ps1")
foreach ($file in $filesToTransfer) {
  if (Test-Path ".\$file") {
    Write-Host "Transferring file $file"
    $fileContent = Get-Content ".\$file"
    Invoke-Command -ComputerName $serverName -Credential $psCreds -ScriptBlock { param($content,$fileName); $content | Set-Content -Path "c:\PESTER\$fileName" -Force } -ArgumentList $fileContent,$file
  }
}

Write-Host "Performing the following additional tests: $tests"
$output = Invoke-Command -ComputerName $serverName -Credential $psCreds -ScriptBlock { param($tests); Set-Location 'C:\PESTER\'; .\azure.Tests.ps1 -tests $tests } -ArgumentList $tests

$output = Invoke-Command -ComputerName $serverName -Credential $psCreds -ScriptBlock { Remove-Item 'C:\PESTER\' -Recurse -Force }
# Reset the script execution policy
if ($policyChanged) {
  Invoke-Command -ComputerName $serverName -Credential $psCreds -ScriptBlock { Set-ExecutionPolicy $Args -Force } -ArgumentList $execPolicy
}

Azure.test.ps1

param($tests)
########## BEGIN SCRIPT HEADER ##########
$TITLE = "DATAPIPE OLDCASTLE PESTER TESTS"
#Authors: Otto Helweg
$Global:Version = "1.0.5"
$Date = "12/10/2016"
##########  END SCRIPT HEADER  ##########

<#
.SYNOPSIS
========================================================================================
AUTOMATION
========================================================================================
These are a set of tests to verify the proper configuration of a Windows Server
#>

Import-Module .\Pester-master\Pester.psm1
. ".\Pester-TestFunctions.ps1"

$extraTests = $tests.Split(",")

if (!($blockSize)) {
  $blockSize = "65536"
}

Describe "$TITLE" {
  It "BigFix should be installed" {
    Test-InstallBES | Should Be "IBM Endpoint Manager Client"
  }

  if ($extraTests -contains "updates") {
    It "No Windows updates should be available" {
      Test-InstallWindowsUpdates | Should Be 0
    }
  }

  It "Firewall should be disabled" {
    Test-DisableWindowsFW | Should Be "Disabled"
  }

  It "RDP session count should be 0" {
    Test-EnableMultipleRDP | Should Be 0
  }

  It "Windows Update check should be disabled" {
    Test-DisableWindowsUpdateCheck | Should Be 1
  }

 It "Volume notification should be disabled" {
   Test-DisableVolumeNotification | Should Be 1
 }

 It "IEESC should be disabled" {
   Test-DisableIEESC | Should Be "Disabled"
 }

  It "UAC should be disabled" {
    Test-DisableUAC | Should Be 0
  }

  It "Should be domain joined" {
    Test-DomainJoin | Should Be 1
  }

  if ($extraTests -like "*drive*") {
    foreach ($test in $extraTests) {
      if ($test -like "*drive*") {
        $driveLetter = $test.Substring(($test.Length - 1),1)
        if ($driveLetter) {
          It "$($driveLetter): volume should exist" {
            Test-DriveLetter $driveLetter | Should Be 1
          }

          It "$($driveLetter): volume should have $blockSize byte blocks" {
            Test-DriveBlockSize $driveLetter $blockSize | Should Be 1
          }
        }
      }
    }
  }

  It ".Net 3.5 should be installed" {
    Test-DotNet35 | Should Be 1
  }

  if ($extraTests -contains "sql") {
    It "SQL should be installed and running" {
      Test-SQLRunning | Should Be 1
    }
    It "SQL remote backup storage should be configured" {
      Test-SQLBackupStorage | Should Be 1
    }
    It "SQL should be configured" {
      Test-SQLConfig | Should Be 1
    }
  }
}

Pester-TestFunctions.ps1

Note: Notice that these test functions are written in PowerShell and executed locally on the remote server. They are examples of the various ways PowerShell can be used to check the state of a server (e.g. Registry check, WMI query, etc.)

########## BEGIN SCRIPT HEADER ##########
$TITLE = "PESTER TEST FUNCTIONS"
#Authors: Otto Helweg
$Global:Version = "1.0.5"
$Date = "12/10/2016"
##########  END SCRIPT HEADER  ##########

<#
.SYNOPSIS
========================================================================================
AUTOMATION
========================================================================================
This is a suite of test functions called by Pester in order to verify the configuration of a Windows Sever
by using Pester tests. These can also be called directly by 'dot sourcing' this file by incluiding this command:
  . ".\WindowsPSM-TestFunctions.ps1"

These functions are named to mimic their sister functions defined in the 'WindowsPSM.psm1' PowerShell Module

#>


function Test-InstallBES {
  $wmiOutput = Get-WmiObject -Query "select * from Win32_Product where Name = 'IBM Enoint Manager Client'"
  $($wmiOutput.Name)
}

function Test-InstallWindowsUpdates {
  $UpdateSession = New-Object -com Microsoft.Update.Session
  $UpdateSearcher = $UpdateSession.CreateupdateSearcher()
  $SearchResult =  $UpdateSearcher.Search("IsAssigned=1 and IsHidden=0 and IsInstalled=0")
  $UpdateLowNumber = 0
  $UpdateHighNumber = 2
  $searchResult.Updates.Count
}

function Test-DisableWindowsFW {
  $firewallState = "Disabled"
  foreach ($profile in $fwProfile) {
    $netshOutput = netsh advfirewall show $profile state
    foreach ($item in $netshOutput) {
      if (($item -like "State*") -and (!($item -like "*OFF"))) {
        $firewallState = "Enabled"
      }
    }
  }
  $firewallState
}

function Test-EnableMultipleRDP {
  $sessionCount = 1
  $sessionCount = (Get-ItemProperty "HKLM:\SYSTEM\CurrentControlSet\Control\Terminal Server").fSingleSessionPerUser
  $sessionCount
}

function Test-DisableWindowsUpdateCheck {
  $updateCheck = (Get-ItemProperty "HKLM:\SOFTWARE\Microsoft\Windows\CurrentVersion\WindowsUpdate\Auto Update\").AUOptions
  $updateCheck
}

function Test-DisableVolumeNotification {
  $volumeNotification = (Get-ItemProperty "HKLM:\SOFTWARE\Microsoft\Windows\CurrentVersion\Policies\Explorer").HideSCAVolume
  $volumeNotification
}

function Test-DisableIEESC {
  if ((((Get-ItemProperty "HKLM:\SOFTWARE\Microsoft\Active Setup\Installed Components\{A509B1A7-37EF-4b3f-8CFC-4F3A74704073}").IsInstalled) -eq '0') -and ((((Get-ItemProperty "HKLM:\SOFTWARE\Microsoft\Active Setup\Installed Components\{A509B1A8-37EF-4b3f-8CFC-4F3A74704073}").IsInstalled -eq 0)))) {
    $ieescState = "Disabled"
  }
  $ieescState
}

function Test-DisableUAC {
  $uacState = 1
  $uacState = (Get-ItemProperty "HKLM:\Software\Microsoft\Windows\CurrentVersion\policies\system").EnableLUA
  $uacState
}

function Test-DomainJoin {
  $domainCheck = (Get-WmiObject -Class win32_computersystem).Domain
  if ($domainCheck) {
    $true
  }
}

function Test-DriveLetter($driveLetter) {
  $volOutput = Get-Volume $driveLetter -erroraction silentlycontinue
  if ($volOutput) {
    $true
  }
}

function Test-DriveBlockSize($driveLetter,$blockSize) {
  $wql = "SELECT Label, Blocksize, Name FROM Win32_Volume WHERE FileSystem='NTFS' AND Name='$($driveLetter):\\'"
  $diskInfo = Get-WmiObject -Query $wql -ComputerName '.' | Select-Object Label, Blocksize, Name
  if ($diskInfo.BlockSize -eq "$blockSize") {
    $true
  }
}

function Test-DotNet35 {
  if (Get-WindowsFeature -Name "NET-Framework-Core") {
    $true
  }
}

function Test-SQLRunning {
  $output = Get-Service -Name "MSSQLSERVER" -ErrorAction SilentlyContinue
  if ($output.Status -eq "Running") {
    $true
  }
}

Output will look something like:

PS C:\pester> .\Test-Server.ps1 -servername server01 -u
Working on server01
Temporarily modifying script execution policy
    Directory: C:\
Mode                LastWriteTime         Length Name                                PSComputerName
----                -------------         ------ ----                                --------------
d----          1/9/2017   3:55 PM                PESTER                              10.10.10.10
Transferring file Azure.tests.ps1
Transferring file Pester-TestFunctions.ps1
Performing the following additional tests: updates,driveu,drivel,sql,
Describing PESTER TEST FUNCTIONS
 [+] No Windows updates should be available 6.98s
 [+] Firewall should be disabled 179ms
 [+] RDP session count should be 0 16ms
 [+] Windows Update check should be disabled 12ms
 [+] UAC should be disabled 12ms
 [+] Should be domain joined 41ms
 [+] u: volume should exist 3.58s
 [+] u: volume should have 65536 byte blocks 100ms
 [+] l: volume should exist 184ms
 [+] l: volume should have 65536 byte blocks 15ms
 [+] .Net 3.5 should be installed 325ms
 [+] SQL should be installed and running 16ms
 [+] SQL remote backup storage should be configured 92ms
 [+] SQL should be configured 22ms

Enjoy!

Atomic Terraform with PowerShell

Summary: In this case, ‘Atomic’ refers to small components rather than nuclear power. This post will discuss the strategy of using many small Terraform plans to build an environment, rather than one large plan. Although this creates a Terraform plan management burden, its primary goal is to reduce Terraform’s blast radius (the amount of damage Terraform can do if its actions are unexpected – granted due typically to user error). In order to try to maintain the same level of automation, we will use PowerShell to automate Terraform provisioning.

When Terraform runs, it assumes that it knows the desired state of an environment and will make any changes necessary to get to this known state. This can be problematic when an environment is changed outside of Terraform, or Terraform’s own state files are not up to date, or changed outside of Terraform (e.g. misconfigured remote state).

We will use PowerShell to perform the following functions:

  • Run multiple Terraform plans with a single command.
  • Run multiple Terraform plans in parallel using PowerShell Jobs.
  • Verify most recent modules are referenced for the Terraform plan.
  • Verify Terraform remote state is properly configured before taking action.
  • Verify Terraform will not ‘change’ or ‘destroy’ anything when provisioning a new instance (unless overridden).

Our environment will contain a single Terraform plan in a sub-directory that represents a single instance. Therefore if an environment has 5 servers and 1 network, there will be 6 sub-directories containing 6 plans.

Note: A future blog post will show how to use PowerShell to programmatically generate all Terraform plans for an environment in order to further reduce the plan management burden for an Atomic Terraform implementation.

Example 1 – Automate Multiple Terraform ‘Applys’: See the above list of actions that PowerShell will take before executing a Terraform Apply.

# Version:: 0.1.5 (10/21/16)
# Script Description:: This script is a wrapper for running multiple terraform commands in the background using PowerShell jobs.
#
# Author(s):: Otto Helweg
#

param($limit)

# Display help
if (($Args -match "-\?|--\?|-help|--help|/\?|/help") -or (!($limit))) {
  Write-Host "Usage: Terraform-Apply-All.ps1"
  Write-Host "     -limit [instance(s)/none]   (required) Specify a specific instance (e.g. VM), or 'none' to run against all servers"
  Write-Host "     -force                      Force the Apply even if elements will be changed or destoryed"
  Write-Host ""
  Write-Host "Examples:"
  Write-Host "     Terraform-Apply-All.ps1 -limit network01,server01 -force"
  Write-Host "     Terraform-Apply-All.ps1 -limit none"
  Write-Host ""
  exit
}

if ($limit -eq "none") {
  $limit = $false
} elseif ($limit) {
  $limit = $limit.Split(",")
}

$instances = (Get-ChildItem -Directory -Exclude "modules").Name
$currentDir = (Get-Item -Path ".\" -Verbose).FullName

$startTime = Get-Date
$jobIds = @{}
foreach ($instance in $instances) {
  $planChecked = $false
  $remoteChecked = $false
  if (($limit -and ($instance  -in $limit)) -or (!($limit))) {
    Write-Host "Working in Terraform directory $instance"
    if (Test-Path $instance) {
      # Check to make sure remote state file is configured
      Set-Location "$instance"
      terraform get
      $remoteOutput = terraform remote pull 2>&1
      Set-Location "..\"
      if ($remoteOutput -notlike "*not enabled*") {
        $remoteChecked = $true
      } else {
        Write-Host -ForegroundColor RED "Error: Remote state file pointer is not configured."
      }

      # Check to make sure nothing will be changed or destroyed (unless forced)
      if ($remoteChecked) {
        Set-Location "$instance"
        $planOutput = terraform plan
        Set-Location "..\"
        if (($planOutput -like "* 0 to change*") -and ($planOutput -like "* 0 to destroy*")) {
          $planChecked = $true
        } else {
          if ($Args -contains "-force") {
            $planChecked = $true
            Write-Host -ForegroundColor YELLOW "Warning: Terraform Apply will change or destroy existing elements. Force detected."
          } else {
            Write-Host -ForegroundColor YELLOW "Warning: Terraform Apply will change or destroy existing elements. Skipping $instance"
          }
        }
      }
      if ($planChecked -and $remoteChecked) {
        $jobInfo = Start-Job -ScriptBlock { Set-Location "$Args"; terraform apply -no-color } -ArgumentList "$currentDir\$instance"
        $jobIds["$instance"] = $jobInfo.Id
        Write-Host "  Creating job $($jobInfo.Id)"
      }
    } else {
      Write-Host -ForegroundColor RED "Error: $instance plan does not appear to exist, consider running 'Build-TerraformEnv.ps1' in ..\setup."
    }
  }
}

$waiting = $true
while ($waiting) {
  $elapsedTime = (Get-Date) - $startTime
  $allJobsDone = $true
  foreach ($instanceKey in $jobIds.Keys) {
    $jobState = (Get-Job -Id $jobIds[$instanceKey]).State
    Write-Host "($($elapsedTime.TotalSeconds) sec) Job $serverKey - $($jobIds[$instanceKey]) status: $jobState"
    if ($jobState -eq "Running") {
      $allJobsDone = $false
    }
  }
  if ($allJobsDone) {
    $waiting = $false
  } else {
    Sleep 10
  }
}

$jobState = @{}
foreach ($instanceKey in $jobIds.Keys) {
  $jobOutput = Receive-Job -Id $jobIds[$instanceKey]
  if ($jobOutput -like "*Apply complete!*") {
    Write-Host -ForegroundColor GREEN "Job $serverKey - $($jobIds[$instanceKey]) output:"
    $jobState[$instanceKey] = "Succeeded"
  } else {
    Write-Host -ForegroundColor RED "Error: Job $serverKey - $($jobIds[$instanceKey]) failed. Output:"
    $jobState[$instanceKey] = "Failed"
  }
  Write-Output $jobOutput
}

Write-Host -ForegroundColor GREEN "Job status summary:"
foreach ($instanceKey in $jobState.Keys) {
  Write-Host "$instanceKey - $($jobState[$instanceKey])"
}
Example 2 – Automate Multiple Terraform Destroys: This is very similar to the above script, but requires less ‘checks’. Merely replace the remote configuration check code with (we don’t need to check the plan since we want Terraform to just delete the instances):
    if ($remoteOutput -notlike "*not enabled*") {
      $jobInfo = Start-Job -ScriptBlock { Set-Location "$Args"; terraform destroy -force -no-color } -ArgumentList "$currentDir\$instance"
      $jobIds["$instance"] = $jobInfo.Id
      Write-Host "  Creating job $($jobInfo.Id)"
    } else {
      Write-Host -ForegroundColor RED "Error: Remote state file pointer is not configured."
    }

And replace the success check with:

  if ($jobOutput -like "*Destroy complete!*") {
    Write-Host -ForegroundColor GREEN "Job $instanceKey - $($jobIds[$instanceKey]) output:"
    $jobState[$instanceKey] = "Succeeded"
  } else {
    Write-Host -ForegroundColor RED "Error: Job $instanceKey - $($jobIds[$instanceKey]) failed. Output:"
    $jobState[$instanceKey] = "Failed"
  }

Enjoy!

Using AWS SSM With Windows Instances

Summary: Late 2015, AWS introduced a new feature called SSM (Simple System Manager) which lets you remotely execute commands on Windows (and Linux) server instances within AWS EC2. Unlike Windows Remote Management, SSM leverages the EC2 infrastructure to directly interact with the server instance, bypassing the need for WinRM ports to be opened up. In addition, SSM commands are interacting with the EC2Config service running on the server instance.

SSM supports several methods on the remote instance including running PowerShell commands as well as a very powerful Windows Update method (which also manages rebooting the server instance). Here’s a list of the available Windows methods in SSM:

  • AWS-JoinDirectoryServiceDomain: join an AWS Directory
  • AWS-RunPowerShellScript: run PowerShell commands or scripts
  • AWS-UpdateEC2Config: update the EC2Config service
  • AWS-ConfigureWindowsUpdate: configure Windows Update settings
  • AWS-InstallApplication: install, repair, or uninstall software using an MSI package
  • AWS-InstallPowerShellModule: install PowerShell modules
  • AWS-ConfigureCloudWatch: configure Amazon CloudWatch Logs to monitor applications and systems
  • AWS-ListWindowsInventory: collect information about an EC2 instance running in Windows
  • AWS-FindWindowsUpdates: scan an instance and determines which updates are missing
  • AWS-InstallMissingWindowsUpdates: install missing updates on your EC2 instance
  • AWS-InstallSpecificWindowsUpdates: install one or more specific updates

Note: SSM commands are run from the Local System account on the EC2 server instance, meaning they are run as Administrator.

The following examples show how to leverage SSM via the AWS CLI utility. AWS CLI must first be installed and configured with the proper credentials for these examples to work. These commands can be run from either a CMD or PowerShell prompt.

Example 1 – Run a PowerShell command with SSM: This demonstrates using PowerShell to modify a firewall rule using SSM on an EC2 instance. Where using User-Data can be used to run PowerShell commands when EC2 creates instances, SSM can be run anytime after the instance is running.

aws ssm send-command --instance-ids "i-12345d8d" --document-name "AWS-RunPowerShellScript" --comment "Update Firewall Rule" --parameters commands="Set-NetFirewallRule -Name WINRM-HTTP-In-TCP-PUBLIC -RemoteAddress Any"

Example 2 – Install all missing updates: This is a very powerful method in SSM where all missing updates can be applied to an EC2 instance with a single command. This method also manages rebooting the instance after the updates are installed, if necessary.

aws ssm send-command --instance-ids "i-12345a86" --document-name "AWS-InstallMissingWindowsUpdates" --comment "Install Windows Upates" --parameters UpdateLevel="All"

Note: All SSM PowerShell commands that are run on an instance are saved in ‘C:\programdata\Amazon\Ec2Config\Downloads\aws_psModule’. This can be useful for troubleshooting commands or should be considered if sensitive information is used within SSM PowerShell commands.

Once an SSM command is executed, the job details are passed back in JSON to allow for monitoring the job state. This allows for automation to query the job status and apply logic for further action.

For example, the job details can be assigned to a PowerShell variable as follows (PowerShell v.4+ is required when using the ConvertFrom-Json cmdlet):

$ssmJob = (aws ssm send-command --instance-ids "i-12345d8d" --document-name "AWS-RunPowerShellScript" --comment "Update Firewall Rule" --parameters commands="Set-NetFirewallRule -Name WINRM-HTTP-In-TCP-PUBLIC -RemoteAddress Any") | ConvertFrom-JSON

The details of the job can be viewed by inspecting the $ssmJob object as follows:

$ssmJob.Command

You can query for the status of an SSM job using the following example:

$ssmJobStatus = (aws ssm list-command-invocations --command-id $ssmJob.Command.CommandId) | ConvertFrom-Json
$ssmJobStatus.CommandInvocations.Status

Enjoy!