Multi Hop Windows Remote Management

Summary: There are cases where it’s necessary to use Windows Remote Management (WinRM), also known as WS-Management (WS-Man) to automate Windows Servers (especially Windows Server that are behind a Windows hop server). This is handy when there is no direct network access to the Windows server that need to be reached (typically for security reasons).

In this example, the following command is executed on the ThirdServer (through the FirstServer and then the SecondServer) in order to update a firewall rule to allow the WinRM service to respond to any source computer request (rather than just the local subnet).

Set-NetFirewallRule -Name WINRM-HTTP-In-TCP-PUBLIC -Action "Allow" -Direction "Inbound" -RemoteAddress "Any"

The default configuration for the WinRM firewall rule in Windows Server 2012+ is to only allow WinRM requests that originate from the local subnet of that server. This command changes a firewall rule to open WinRM to respond to requests from any source IP address.

multihopwinrm1

In addition, for environments that require multi-hop access over and to Windows Servers, RDP can be problematic if there are any network bandwidth or latency issues. For actions that don’t require access to the Windows desktop, WinRM is ideal since it is much more efficient and faster.

Note: The authentication token for the session on the ThirdServer may be reduced compared to the access available for the FirstServer. Specifically for access to external resources like network shares. 

MultiHop-ConfigWinRm.ps1

# Version:: 0.1.0 (1/13/2016)
# Script Description:: Expands WinRM scope.
#
# Author(s):: Otto Helweg
#

Write-Host "Configuring WinRM for remote access..."
# Get the necessary credentials for WinRM (usually Administrator level creds)
$creds = Get-Credential
$serverName = "FirstServer"
$secondServerName = "SecondServer"
$thirdServerName = "ThirdServer"

Write-Host "Running command from $serverName"
Invoke-Command -ComputerName $serverName -Credential $creds -ScriptBlock {
  param($secondServerName,$thirdServerName,$creds)
  Write-Host "Running command from $secondServerName"
  Invoke-Command -ComputerName $secondServerName -Credential $creds -ScriptBlock {
    param($thirdServerName,$creds)
    Write-Host "Running command from $thirdServerName"
    Invoke-Command -ComputerName $thirdServerName -Credential $creds -ScriptBlock {
      Set-NetFirewallRule -Name WINRM-HTTP-In-TCP-PUBLIC -Action "Allow" -Direction "Inbound" -RemoteAddress "Any"
    }
  } -ArgumentList $thirdServerName,$creds
} -ArgumentList $secondServerName,$thirdServerName,$creds

Note: The username for the credentials, needs to include the domain or server prefix. If this is a local account, use the ‘local\’ prefix. Therefore a local ‘Administrator’ account should be entered as ‘local\Administrator’.

Enjoy!

Ansible vs. Chef for Managing Windows

ConfigureRemotingForAnsible.ps1Summary: Ansible is a simple and powerful application/DevOps framework for managing Windows configuration and provisioning. Getting off the ground with Ansible was also fairly straightforward and doesn’t require a large time or infrastructure investment.

These are some initial thoughts about using Ansible to manage the Windows platform (specifically compared to Chef). This analysis does not consider the ways in which Chef might be a better choice than Ansible for Windows management (they do exist and might be the subject of another blog post in the future).

The Ansible pilot was setup to be able to mimic some existing Chef recipes in order to determine time investment and infrastructure requirements as well as Ansible capabilities. The pilot consisted of an Ansible server (CentOS 6 – 64bit) and a Windows server (Windows Server 2012 Standard Edition) to be managed. Findings were as follows (in no particular order):

Note: Ansible Module  = Chef Resource, Ansible Playbook = Chef Recipe

  • Agentless: Ansible does not use an agent to manage Windows, but merely uses Windows’ built in Windows Remote Management (WinRM) protocol and framework.
  • WinRM Configuration: The PowerShell script ConfigureRemotingForAnsible.ps1 needs to be run on the managed node in order to enable communication with the Ansible server. The script basically configures a custom HTTPS listener with a special certificate.
  • PowerShell 3.0: PowerShell 3.0 or above is required by Ansible. With PowerShell 3.0, the following Hotfix KB2842230 may also need to be installed. On the other hand, Chef works well with PowerShell 2.0. PowerShell 3.0 can be easily updated on versions of Windows Server (pre 2012 came with PowerShell 2.0) by installing the Windows Management Framework (WMF) 3.0.
  • Predictable Execution: Ansible playbooks have a single execution phase, rather than Chef’s compile then execute phases, which, in some cases, can make Chef recipes less predictable. For example in Chef, modifying an environmental variable several times on a managed node within a single run_list will produce unexpected results.
  • Fewer Facts: Far fewer Ansible Facts are discovered at runtime than Ohai Attributes for a Windows host (this is not so with Linux). Chef’s Ohai discovers the same mountain of properties on both Windows and Linux.
  • Parameters: Parameters can be passed into the Ansible Playbook from the command line which is useful for changing Playbook behavior when it’s executed.
  • PowerShell: Ansible runs pure PowerShell scripts “as is”. Chef requires PowerShell scripts to be slightly modified by escaping certain characters. Ansible also simply manages the transfer of the script to the managed node, script execution, and script removal.
  • External File Transfers: The Ansible URL module nicely transfers big files via a URL. This is convenient when using Artifactory or Pydio to pull down large binaries for installation or processing.
  • Unzipping Files: The Ansible ZIP module is simple to use and nicely expands compressed files on the managed node.
  • Variable Passing: Variables can be easily passed out of a PowerShell script to the Playbook (or other modules) during runtime. This is useful when PowerShell is used to dynamically gather or process needed data at runtime. Although Chef easily allows for the passing of Attributes into PowerShell scripts, pulling data back out of those scripts is tricky.
  • Windows Update Works! The Windows Update module works (no permissions issues, I don’t know how Ansible is accomplishing this because this is a known issue with Chef). The problem lies in Windows not granting access to certain internal methods when accessed remotely, even with Administrator credentials. To see how this can be overcome with Chef, go to this blog post on the topic.
  • Reboot Management: Ansible playbooks can easily manage reboots since the Playbook is being run from the Ansible server and not the Node.
  • User Input: An Ansible Playbook can take user input during runtime. For example getting runtime credentials when joining a Windows node to a domain.

Windows Update Playbook Example:

---
# This playbook installs Windows updates
# Run with the following command:
#   ansible-playbook update-win.yml --ask-pass --u Administrator

- name: Configure Server
  hosts: windows
  gather_facts: true
  tasks:
    - name: Install Windows updates
      win_updates:
        category_names: ['SecurityUpdates','CriticalUpdates','UpdateRollups','Updates']

    - name: Restart machine
      raw: shutdown /r /f /c "Ansible updates triggered"
      async: 0
      poll: 0
      ignore_errors: true

    - name: Waiting for server to come back
      local_action: wait_for
                    host={{ inventory_hostname }}
                    state=started
                    timeout=60
      sudo: false

Windows Domain Join Playbook Example:

---
# This playbook joins Windows to a domain
# Run with the following command:
#   ansible-playbook joindomain-win.yml --ask-pass --u Administrator


- name: Join domain
  hosts: windows
  gather_facts: true
  vars_prompt:
    - name: "user"
      prompt: "Domain Join username"
      private: no
    - name: "password"
      prompt: "Domain Join password"
      private: yes
  tasks:
    - name: Join domain script
      script: "files/join-domain.ps1 -u '{{ user }}' -p '{{ password }}'"
      ignore_errors: true

    - name: Waiting for server to come back
      local_action: wait_for
                    host={{ inventory_hostname }}
                    state=started
                    timeout=60
      sudo: false

Windows Domain Join PowerShell Script Example:

#
# Script:: join-domain.ps1
# Joins a sesrver to a domain
#

param($u,$p)

$securePassword = ConvertTo-SecureString -String $p -AsPlainText -Force
$psCreds = new-object -typename System.Management.Automation.PSCredential -argumentlist $u, $securePassword


$domainCheck = (Get-WmiObject -Class win32_computersystem).Domain
if (!($domainCheck -eq "contoso.com")) {
  Add-Computer -DomainName "contoso.com" -Credential $psCreds -Force -Restart

  eventcreate /t INFORMATION /ID 1 /L APPLICATION /SO "Ansible-Playbook" /D "joindomain-win: Added to the domain 'contoso.com'."
}

Enjoy!

PowerShell DSC Script Example – Node Configuration

The following PowerShell DSC script was converted from a Chef recipe for Windows located here. It’s easy to see that there’s a lot of similarity to the logic that PowerShell DSC and Chef use regarding their resources and provisioning or configuring as node (server). PowerShell DSC adds an additional feature in their Script Resource called ‘GetScript’ which handles gathering information from the Node (not used in this example) for use elsewhere in the Script Resource (must be passed back as a hash). In addition, idempotency is managed by ‘TestScipt’ passing back either $true or $false, where $false will cause ‘SetScript’ to execute. Lastly, all variables must be defined within a Script Resource (most commonly a script block) and not outside of the resource, otherwise they will be evaluated and stored at the time of the MOF file generation.

The following script demonstrates some of the server configuration functionality via PowerShell’s new DSC service, and performs the following actions:

  1. Timestamp: A Windows Event is created and an environmental variable is updated to show the last time this recipe was executed on the server.
  2. Enable Remote Desktop: The Remote Desktop (RDP) functionality is enabled.
  3. Disable Windows Updates: Windows automatic updates are disabled (use with caution – unless you have another update process, don’t do this).
  4. Enable Windows Remote Management: The Windows Remote Management functionality is enabled.
  5. Install IIS: The Application Server and Web Server roles are installed and enabled.
  6. Disable Server Reboot Tracking: A minor registry key is added/updated to stop the default practice of asking for a reboot reason on Windows Server.

DSC Publishing Steps:

The following steps are taken to publish a MOF file that’s ready to be consumed by nodes:

  1. PowerShell DSC script is written (below) and executed.
  2. In the current working directory (important!) a MOF file is created, representing the resources called out in the DSC script.
  3. The MOF file is named after the ‘Node’, in a sub-directory named after the ‘Configuration’ call (e.g. in this case it would be named ‘.\ServerConfig\Anybody.mof’)
    The MOF file is copied to the PowerShell DSC server’s hosting directory.
  4. A sister CheckSum file is generated for the newly created MOF file.
  5. Nodes will the download the MOF file via a REST call, specifying a specific MOF file by GUID (a node can only be configured to download a single MOF file). This will be covered in another blog.

DSC Script:

Configuration ServerConfig
{
  Node Anybody
  {
    # Leaves a timestamp indicating the last time this script was run on the node (this resource is intentionally not idempotent)
    Script LeaveTimestamp
    {
      SetScript = {
        $currentTime = Get-Date
        $currentTimeString = $currentTime.ToUniversalTime().ToString()
        [Environment]::SetEnvironmentVariable("DSCClientRun","Last DSC-Client run (UTC): $currentTimeString","Machine")
        eventcreate /t INFORMATION /ID 1 /L APPLICATION /SO "DSC-Client" /D "Last DSC-Client run (UTC): $currentTimeString"
      }
      TestScript = {
        $false
      }
      GetScript = {
        # Do Nothing
      }
    }
 
    # Enables remote desktop access to the server
    Registry EnableRDP-Step1
    {
      Ensure = "Present"
      Key = "HKEY_LOCAL_MACHINE\System\CurrentControlSet\Control\Terminal Server"
      ValueName = "fDenyTSConnections"
      ValueData = "0"
      ValueType = "Dword"
      Force = $true
    }
 
    Registry EnableRDP-Step2
    {
      Ensure = "Present"
      Key = "HKEY_LOCAL_MACHINE\System\CurrentControlSet\Control\Terminal Server\WinStations\RDP-Tcp"
      ValueName = "UserAuthentication"
      ValueData = "1"
      ValueType = "Dword"
      Force = $true
    }
 
    Script EnableRDP
    {
      SetScript = {
        Enable-NetFirewallRule -DisplayGroup "Remote Desktop"
        eventcreate /t INFORMATION /ID 2 /L APPLICATION /SO "DSC-Client" /D "Enabled Remote Desktop access"
      }
      TestScript = {
        if ((Get-NetFirewallRule -Name "RemoteDesktop-UserMode-In-TCP").Enabled -ne "True") {
          $false
        } else {
          $true
        }
      }
      GetScript = {
        # Do Nothing
      }
    }
 
    # Disables checking for updates
    Script DisableUpdates
    {
      SetScript = {
        $WUSettings = (New-Object -com "Microsoft.Update.AutoUpdate").Settings
        $WUSettings.NotificationLevel = 1
        $WUSettings.save()
        eventcreate /t INFORMATION /ID 3 /L APPLICATION /SO "DSC-Client" /D "Disabled Checking for Updates"
      }
      TestScript = {
        $WUSettings = (New-Object -com "Microsoft.Update.AutoUpdate").Settings
        if ($WUSettings.NotificationLevel -ne "1") {
          $true
        } else {
          $false
        }
      }
      GetScript = {
        # Do Nothing
      }
    }
 
    # Verifies Windows Remote Management is Configured or Configures it
    Script EnableWinrm
    {
      SetScript = {
        Set-WSManQuickConfig -Force -SkipNetworkProfileCheck
        eventcreate /t INFORMATION /ID 4 /L APPLICATION /SO "DSC-Client" /D "Enabled Windows Remote Management"
      }
      TestScript = {
        try{
          # Use to remove a listener for testing
          # Remove-WSManInstance winrm/config/Listener -selectorset @{Address="*";Transport="http"}
          Get-WsmanInstance winrm/config/listener -selectorset @{Address="*";Transport="http"}
          return $true
        } catch {
          #$wsmanOutput = "WinRM doesn't seem to be configured or enabled."
          return $false
        }
      }
      GetScript = {
        # Do Nothing
      }
    }
 
    # Installs the Applicaiton-Server Role
    Script InstallAppServer-LogEvent
    {
      SetScript = {
        eventcreate /t INFORMATION /ID 6 /L APPLICATION /SO "DSC-Client" /D "Installed Role: Applicaiton-Server"
      }
      TestScript = {
        if ((Get-WindowsFeature -Name Application-Server).Installed) {
          $true
        } else {
          $false
        }
      }
      GetScript = {
        # Do Nothing
      }
    }
 
    WindowsFeature InstallAppServer-Step1
    {
      Name = "Application-Server"
      Ensure = "Present"
      IncludeAllSubFeature = $true
    }
 
    WindowsFeature InstallAppServer-Step2
    {
      Name = "AS-Web-Support"
      Ensure = "Present"
      IncludeAllSubFeature = $true
      DependsOn = "[WindowsFeature]InstallAppServer-Step1"
    }
 
    # Disables Shutdown tracking (asking for a reason for shutting down the server)
    Script DisableShutdownTracking-LogEvent
    {
      SetScript = {
        eventcreate /t INFORMATION /ID 7 /L APPLICATION /SO "DSC-Client" /D "Disabled Shutdown Tracking"
      }
      TestScript = {
        if ((Get-ItemProperty -Path 'HKLM:\\SOFTWARE\Policies\Microsoft\Windows NT\Reliability').ShutdownReasonOn -ne "0") {
          $false
        } else {
          $true
        }
      }
      GetScript = {
        # Do Nothing
      }
    }
 
    Registry DisableShutdownTracking
    {
      Ensure = "Present"
      Key = "HKEY_LOCAL_MACHINE\SOFTWARE\Policies\Microsoft\Windows NT\Reliability"
      ValueName = "ShutdownReasonOn"
      ValueData = "0"
      ValueType = "Dword"
      Force = $true
    }
  }
}
 
# The MOF filename must be a GUID. It can be any unique GUID and can be generated by the following PowerShell command ([guid]::NewGuid()).
$guid = "45b51dc8-132c-4052-8e3b-479c73d4c9cc"
 
# Create the MOF file from the above PowerShell DSC script
ServerConfig
 
# Used to copy the newly generated MOF file in the Pull Server's publishing location
$mofFile = "c:\dscscripts\ServerConfig\Anybody.mof"
$mofPath = "C:\Program Files\WindowsPowerShell\DscService\Configuration"
$DSCMofFile = $mofPath + "\" + $guid + ".mof"
 
Copy-Item $mofFile -Destination $DSCMofFile
# Generate a CheckSum sister file for the MOF file

 New-DSCCheckSum $DSCMofFile -Force
After the DSC script is executed on the node, New Windows Events should be logged to the configured node (server):

DSC-Example-1

And the following web page should be viewable on the node (server):

DSC-Example-2

The following practices are leveraged in this recipe:
  • A time stamp is logged on the server in order to track every time the script is executed via both a Windows Event and a Machine Environmental Variable (the environmental variable doesn’t refresh until you log out and log back in – is CMD getting cached somewhere?). This might be helpful for troubleshooting issues by correlating with the recipe execution timestamp.
  • A Windows Event is logged every time a resource is executed on the node (server). Event IDs are unique to the resource function.
  • All resources (except the timestamp resource) are idempotent. In other words, logic is in place to insure the resource is not executed if it doesn’t need to be. For example, if IIS has already been installed, then there should be no attempt to install it again. This is a ‘best practice’ for writing DSC scripts.
The following PowerShell functionality is exercised by this recipe:
  • An Environmental Variable is created/updated
  • Events are created with the ‘eventcreate’ command. The PowerShell ‘New-Event’ is not used because for Windows Server (not client) you need to register your custom event source with the server, so ‘eventcreate’ is simpler.
  • A Registry Key is added/updated
  • The Enable-FirewallRule cmdlet is used
  • A COM object is accessed and/or updated
  • The Set-WsmanQuickConfig cmdlet is used
  • The Get-WsmanInstance cmdlet is used
  • The Add-WindowsFeature cmdlet is used

Idempotency:

Notice that the Script Resource implements PowerShell script logic (via ‘TestScript’) in order to make the resource follow idempotent best practices (most of the other resources manage this for you). The logic implemented in the Script Resource is a reasonable attempt to determine if action is necessary, while not covering every possible permutation that might exist for a misconfigured server. Also notice how either $true or $false is passed back to the resource from the test logic. And finally, the ‘SetScript’ block is not executed unless ‘$false’ is returned by the ‘TestScript’ logic.

Enjoy!

Sample PowerShell 2.0 Remoting Commands

The following are a list of commands that I demonstrated at TechEd 2010 in New Orleans. Actually I should say that I intended to demo these commands, but wasn’t able to complete the entire list due to a conference wide network outage. :‐﴾

Many of these commands were intended to run against a real world web server in the Internet ﴾http://wsman.msft.net﴿. For one command ﴾WS‐Man ID﴿, I’ll include the web server in the command syntax. Otherwise I’ll just use “<server name>” to specify the destination. In addition, my demo server is configured to respond to WS‐Management from the original port 80 ﴾rather than the new port 5985 which was changed in WinRM 2.0﴿.

Note: If your client or end points are not Windows7 or Windows Server 2008 R2, then you will need to have PowerShell 2.0 installed on both systems. You can get the bits as Windows updates from http://download.microsoft.com.

Note: All commands are intended to be executed from PowerShell 2.0 or the PowerShell Integrated Scripting Environment (ISE).

Test WS‐Man connectivity without authentication.

This is useful for making sure the network and the Windows Remote Manage service are operational and intentionally does not check credentials since that is usually another level of configuration can be tested on its own.

test-wsman –computername wsman.msft.net:80 –authentication none

Create a credential token to be used throughout the remaining commands.

$cred = get-credential <administrator account name on end point>

Test WS‐Man connectivity with credentials ﴾note version info is now displayed﴿.

As mentioned above, it is helpful to be able to isolate authentication when troubleshooting management connectivity issues.

test-wsman -computername <server name>:<port if other than 5985> -authentication default -credential $cred

Enumerate status for all Services.

This is merely using WS‐Man as the transport for accessing WMI providers. In the past, DCOM was the transport, but had many limitations due to its firewall unfriendly nature.

get-wsmaninstance -enumerate wmicimv2/win32_service -computername <server name>:<port if other than 5985> -authentication default -credential $cred

Enumerate status for IIS Service.

This demonstrates getting the state of a specific service ﴾or element﴿ by using the “selectorset” parameter.

get-wsmaninstance wmicimv2/win32_service -selectorset @{name="w3svc"} -computername <server name>:<port if other than 5985> -authentication default -credential $cred

Stop and Start the IIS Service.

Again, this is merely using WS‐Man as the transport in order to manipulate WMI methods that have been around since the dawn of time.

invoke-wsmanaction -action stopservice -resourceuri wmicimv2/win32_service -selectorset @{name="w3svc"} -computername <server name>:<port if other than 5985> -authentication default -credential $cred

This will verify the state of the stopped service.

get-wsmaninstance wmicimv2/win32_service -selectorset @{name="w3svc"} -computername <server name>:<port if other than 5985> -authentication default -credential $cred

Now restart the IIS service.

invoke-wsmanaction -action startservice -resourceuri wmicimv2/win32_service -selectorset @{name="w3svc"} -computername <server name>:<port if other than 5985> -authentication default -credential $cred

Store Output into an Object.

WMI instrumentation and actions are now very easy to automate with the addition of WS‐Man as a transport for remoting and PowerShell for scripting. The example here shows how the WMI information can be pulled into an object and properly formatted.

$operatingsystem = get-wsmaninstance -enumerate wmicimv2/win32_operatingsystem -computername <server name>:<port if other than 5985> -authentication default -credential $cred

Show the output for the Last Boot Time for the end point.

$operatingsystem.LastBootUpTime

Format this Boot Time data into a proper .Net DateTime object.

[datetime]$operatingsystem.LastBootUpTime.datetime

Query a VM Host

A good deal of Microsoft’s hypervisor’s ﴾Hyper‐V﴿ as well as VMWare’s hypervisor’s instrumentation and management is exposed via WMI. The following command displays characteristics of the Hyper‐V parent as well as all of its children.

get-wsmaninstance -enumerate wmi/root/virtualization/Msvm_computersystem -computername <server name>:<port if other than 5985> -authentication default -credential $cred

Create a persistent connection to a Remote System.

This is using WS‐Man to create a connection to the remote system, not PowerShell. Note that the port is not used in‐line with the “ComputerName”.

Connect-WSMan -computername <server name> -authentication default -credential $cred -port <port if other than 5985>

This will show the configuration of the remote system, including the listener.

cd wsman:

The connection does need to be ended.

disconnect-WSMan -computername wsman.msft.net

Create and use a PowerShell Remoting Session.

Using PowerShell for remote management is much more powerful as it allows for the scripts ﴾or script blocks﴿ to be passed within the connection rather than requiring them to exist on the remote computer.

Note: If the script or script block that is being passed to the remote computer is using any special modules, they will need to exist on the remote computer (modules are note passed with the script).

$wsman = new-pssession -computername <server name> -port <port if other than 5985> -authentication default -credential $cred

This merely shows how to remotely execute a single PowerShell command on a remote machine and that the output is returned as a formatted object with the remote machine’s meta data attached to the results.

invoke-command -session $wsman -scriptblock {getprocess}

We’ll then put the results into an object. Notice now nicely the data in the object is formatted. This is not the case when non‐PowerShell commands are executed remotely ﴾see below﴿.

$output = invoke-command -session $wsman -scriptblock {getprocess}

This shows how to tear down the remote session.

remove-pssession -session $wsman

Create and use a PowerShell Remoting Session on Several Servers

One of the most powerful features of PowerShell remoting is the ability to execute scripts on many servers simultaneously ﴾knows as “fan out”﴿. There is also the ability to throttle the number of servers that are simultaneously running scripts. The example below shows how to specify multiple servers within the command, but there are other ﴾more programmatic﴿ ways of doing this ﴾see “get‐help” for examples﴿.

$several = new-pssession -computername <server  name 1>,<server name 2>,<server name 3> -port <port if other than 5985> -authentication default -credential $cred
invoke-command -session $several -scriptblock {getprocess}
$output = invoke-command -session $several -scriptblock {getprocess}

The following example show how a “fan out” PowerShell command can also be executed in the background and monitored by using the “asjob” flag.

invoke-command -session $several -scriptblock {getprocess} asjob
get-job
receive-job -id <ID # listed from "getjob">

The following example shows how the output is formatted if the executed command is not a PowerShell script or cmdlet.

invoke-command -session $several -scriptblock {ipconfig /all}

When the results are placed in a PowerShell object, the object is essentially an array of single lines of text.

$output = invoke-command -session $several -scriptblock {ipconfig /all}
remove-pssession -session $several

Enter into a PSSession

The following examples show how to remote to a single end point and execute commands ﴾in this case the commands will stop and restart the web service﴿.

$wsman = new-pssession -computername <server name> -port <port if other than 5985> -authentication default -credential $cred
enter-pssession -session $wsman
net stop w3svc
net start w3svc
exit-possession
remove-pssession -session $wsman

Enjoy!

Hyper-V Virtual Identification

Since virtual machines can be easily moved between physical hosts (parents), it becomes important to track where virtual machines are physically residing for both asset management as well as troubleshooting purposes. The following post focuses on discovering the relationship between virtual hosts (parents) and the virtual machines (children) from both the perspective of the parent as well as the perspective of the child.

HyperV-ID-1

Note: The following examples use the WinRM and WinRS command-line utilities which shipped with Windows Vista and Windows Server 2008, but are also available as an Out-Of-Band install for Windows XP SP2+ and Windows Server 2003 SP1+ here.

Query the Parent:

Most commonly used for asset collection, this model gathers the names (and other virtual machine characteristics) of all the children running on a virtual host. This method queries the Hyper-V specific WMI provider/class by using the following command.

winrm enumerate wmi/root/virtualization/msvm_computersystem /r:<remote Hyper-V Host>

With the following sample output:

Msvm_ComputerSystem
     AssignedNumaNodeList = 0
     Caption = Virtual Machine
     CreationClassName = Msvm_ComputerSystem
     Description = Microsoft Virtual Machine
     ElementName = PROV-XP
     EnabledDefault = 2
     EnabledState = 2
     HealthState = 5
     InstallDate
          Datetime = 2008-07-01T21:47:02Z
     Name = 31F497F1-2437-4E89-8308-BE07FB5C14C2
     NameFormat = null
     OnTimeInMilliseconds = 432464839
     OperationalStatus = 2
     OtherEnabledState = null
     PrimaryOwnerContact = null
     PrimaryOwnerName = OTTOH-HOST\Administrator
     ProcessID = 2628
     RequestedState = 12
     ResetCapability = 1
     Status = null
     TimeOfLastConfigurationChange
          Datetime = 2008-07-30T17:07:06Z
     TimeOfLastStateChange
          Datetime = 2008-07-30T17:07:06Z

Query the Child:

Most commonly used for troubleshooting scenarios where a virtual machine is being evaluated and needs to be queried in order to determine its physical host (parent). The following command queries the registry on the child in order to determine its host (parent):

HyperV-ID-2

Remote Access Method #1 (the /f parameter merely structures the output in XML – handy for scripting, especially in PowerShell):

winrm invoke GetStringValue wmi/root/default/StdRegProv @{hDefKey="2147483650";sSubKeyName="Software\Microsoft\Virtual Machine\Guest\Parameters";sValueName="PhysicalHostNameFullyQualified"} /r:<Remote VM> /u:<Username> /p:<Password> /f:pretty

Remote Access Method #2:

winrs /r:<Remote VM> /u:<Username> /p:<Password> reg query "HKLM\Software\Microsoft\Virtual Machine\Guest\Parameters" /v PhysicalHostNameFullyQualified

Note: The first method demonstrates a powerful way to access the value of any registry key using the ‘StdRegProv’ WMI provider via WS-Man/WinRM for remote transport. Other registry hives can be accessed with the following hDefKey values: HKLM=2147483650, HKCU=2147483649, HKCR=2147483648, HKEY_USERS=2147483651.

Enjoy!

A Few Good Windows Remote Management Commands

In Vista and beyond, a lot of instrumentation, configuration, and utilization information is exposed via WS-Man. WS-Man (aka: WS-Management, Windows Remote Management, and WinRM) incorporates many features, but I like to think of it as the management protocol/framework of the future (look out SNMP!). What makes WS-Man so great is the fact that it’s all standards based, rides on HTTP/HTTPS (very firewall/NAT friendly), and packages its data in SOAP/XML packets (easy to shove into a database or use with a script).

Out of the box; Vista WS-Man exposes WMI information as well as Windows Remote Shell capabilities. What this means is that with WS-Man it’s much easier to get instrumentation from remote machines as well as use that info in scripts.

Here are some sample commands to play with. If you cannot get the ‘Test WS-Man…’ step to work, none of the steps following will work either (you’re probably not using the right credentials to access the remote machine). One more caveat, the remote commands work best on domain joined machines. For workgroup machines, the WinRM service needs additional configuration.

Quickly configure the WS-Man service (Run from an Elevated Command prompt):

winrm QuickConfig

Quickly delete the WS-Man listener (Run from an Elevated Command prompt):

winrm invoke Restore winrm/Config @{}

Display your machine’s basic hardware info:

winrm enumerate wmicimv2/Win32_ComputerSystem

Display your operating system properties:

winrm get wmicimv2/Win32_OperatingSystem

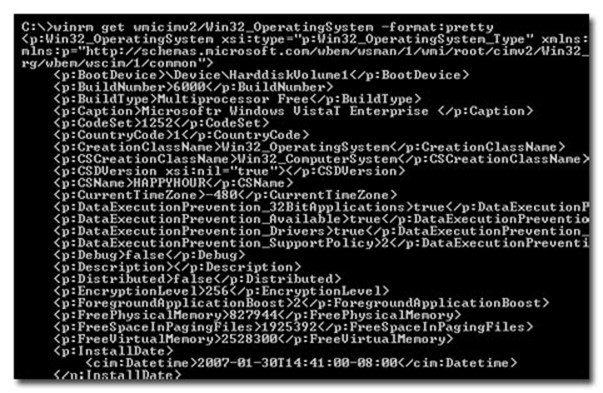
Output your OS info in XML:

winrm get wmicimv2/Win32_OperatingSystem -format:pretty

Ping WS-Man on a remote machine:

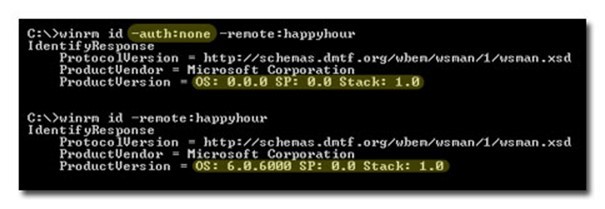
winrm id -auth:none -remote:<some machine>

Test WS-Man access to a remote machine**:

winrm id -remote:<some machine>

Grab a remote machine’s WS-Man config:

winrm get winrm/Config -r:<some machine>

Grab a remote machine’s CPU load:

winrm g wmicimv2/Win32_Processor?DeviceID=CPU0 -fragment:LoadPercentage -r:<some computer>

Grab a remote machine’s free memory:

winrm g wmicimv2/Win32_OperatingSystem -fragment:FreePhysicalMemory -r:<some computer>

Stop a service on a remote machine:

winrm invoke stopservice wmicimv2/Win32_Service?name=w32time -r:<some computer>

Start a service on a remote machine:

winrm invoke startservice wmicimv2/Win32_Service?name=w32time -r:<some computer>

Reboot a remote machine:

winrm invoke reboot wmicimv2/Win32_OperatingSystem -r:<some computer>

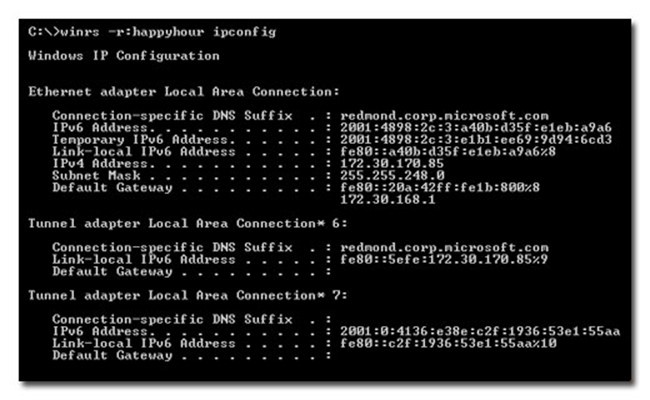
Run a command on a remote machine (this uses winrS, not winrM):

winrs -r:<some computer> ipconfig /all

Use PowerShell to grab the WS-Man Win32_OperatingSystem XML output (Run from PowerShell):

[xml]$osInfo = winrm get wmicimv2/Win32_OperatingSystem /format:pretty

Display the OS version property:

$osInfo.Win32_OperatingSystem.Version

Display the last boot time:

$osInfo.Win32_OperatingSystem.LastBootupTime.DateTime

Put free memory metric into an XML variable:

[xml]$freemem = cmd /c "winrm get wmicimv2/Win32_OperatingSystem -fragment:FreePhysicalMemory -f:pretty -r:<some computer>"

Display the free memory value:

$freemem.XMLFragment.FreePhysicalMemory

Note: This step verifies that you have good connectivity to the remote machine, WS-Man is running and properly configured on the remote machine, AND you have the correct permissions to fully leverage WS-Man on the remote machine. If this step fails, it’s probably a permissions issue.

Details:

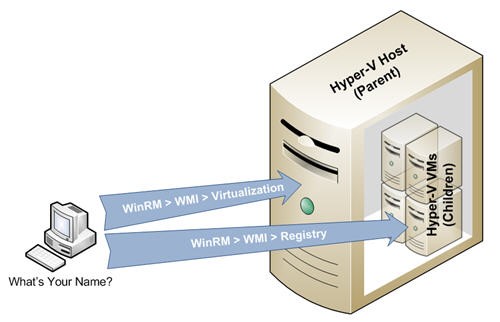
WS-Man (WinRM) Architecture

The following diagram shows a high-level overview of the WS-Man (WinRM) architecture. In the diagram the ‘Client’ is querying the ‘Server’ for WS-Man information. Note that HTTP.sys and WinHTTP support the HTTP(s) transport for WS-Man, not IIS. In addition, IIS (or another web publishing service) can co-exist with WS-Man and share port 80 (granted, in Windows 7 and beyond, the default ports are 5985 and 5986 for http and https respectively, although I still prefer to use 80 and 443).

WSMan-Commands-1

Quickly configure the WS-Man service

Remember, this needs to be run from an ‘Elevated’ Command Prompt.

As you can see, this simple command does quite a bit. Please note every modification (hightlighted) since this might increase the attack surface of your computer. For example, Quick Config configures a listener that accepts connections from every network interface. This is probably not ideal for edge machines that connect to unsecure networks (like the Internet). In addition, this command only needs to be run once.

WSMan-Commands-2

Quickly delete the WS-Man listener

Although this command only deletes all WinRM listeners, it effectively turns off any WS-Man communication to a machine.

WSMan-Commands-3

Display your machine’s basic hardware info and operating system properties

Win32_ComputerSystem and Win32_OperatingSystem are common WMI classes and useful for asset information and configuration information as well as some utilization metrics.

WSMan-Commands-4

Output your OS info in XML

XML output makes the data much easier for storing in a database or dealing with programmatically (like with a script). PowerShell makes this that much easier since it works VERY well with XML (see below for a sample PowerShell script).

WSMan-Commands-5

Ping WS-Man on a remote machine and test authorization credentials

Testing WS-Man on a remote machine is very useful in troubleshooting lots of connectivity and configuration issues. When pinging WS-Man without ‘auth’, it allows for the testing of the connectivity and basic service configuration. Using the ‘auth’ parameter tests the necessary authorization. Generally the credentials need to be in the ‘Administrators’ group for ‘auth’ to work. In this case no credentials are provided so the current credentials are used (this can be over-ridden). Notice that the OS version is included when successfully using ‘auth’ to test WS-Man.

WSMan-Commands-6

Grab a remote machine’s WS-Man config

Successfully completing this step pretty much insures that one has complete access to WS-Man on the remote computer.

Grab a remote machine’s CPU load, free memory, and restart a service

WS-Man allows for gathering WMI properties (reading and writing although we’re only reading in this example) as well as invoking methods (starting and stopping a service; as well as rebooting!). Notice the minimal return code for the invoke commands (0 = success).

WSMan-Commands-7

Run a command on a remote machine (this uses winrS, not winrM)

WinRS is another utility that leverages WS-Man. WinRS allows for the execution of local, non-interactive command-line commands on a remote machine and returns the output. In other words, if the command can be run at the CMD prompt without any required input and it only accesses local resource (no network shares for example), then it will most likely work. There are ways to get around the ‘local resource’ issue, but that is out of scope for this blog.

WSMan-Commands-8

Use PowerShell to grab instrumentation via WS-Man

PowerShell is great for consuming data from WS-Man since it works very well with XML. Notice that in the following example it’s easy to ‘surf’ an object in PowerShell. In this case the XML object ‘osInfo’ is displayed on its own, and then expanded to the ‘Win32_OperatingSystem’ branch.

WSMan-Commands-9

A simple PowerShell script

The following script shows how easy it is to automate the collection of WS-Man information using PowerShell.

$machines = ("machine1","machine2","machine3")
foreach ($machine in $machines) {
  [xml]$osInfo = winrm get wmicimv2/Win32_OperatingSystem /format:pretty /r:$machine
  $machine + ": " + $osInfo.Win32_OperatingSystem.LastBootupTime.DateTime
}

More Info

For more information on WS-Man, please see the following articles:

Enjoy!