CloudStack API PowerShell Example

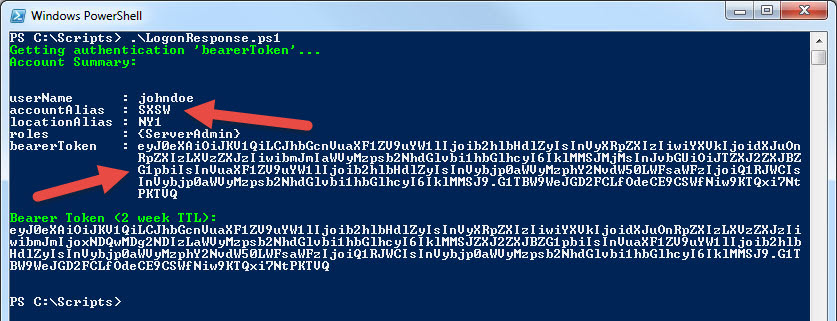
Summary: This script uses a simple command, sent via PowerShell and REST to a CloudStack API, in order to list all visible Virtual Machines as well as their current state (‘Running’, ‘Stopped’, etc.).

CloudStack is an Apache Open Source project for managing a cloud service (much like OpenStack, but it’s been around a LOT longer). CloudStack also has an impressive list of customers (check out their Wikipedia post above). Like most cloud services, CloudStack has an API (REST) for programmatically interacting with the service.

Note: A valid account’s API public key and secret are required for this script.

This API authenticates requests by using an account’s public key and secret to create a signature for the API request. In order the create the signature, the command being signed must be broken down into key/value pairs, sorted, reassembled for signing, then converted to lower case.

On-going problems: This script mostly works. But it (or the API) has problems with certain command strings. And PowerShell doesn’t seem to like the API’s output in JSON (so this script uses the default XML). If you find a solution, please reach out.

Datapipe’s documentation of their implementation of the CloudStack API can be found here: https://docs.cloud.datapipe.com/developers/api/developers-guide

Here is a sample list of command strings that leverage the listVirtualMachines method (your mileage may vary):

command=listVirtualMachines
command=listVirtualMachines&state=Running
command=listVirtualMachines&account=General
command=listVirtualMachines&zoneid=13
command=listVirtualMachines&groupid=21&account=General
command=listVirtualMachines&groupid=21&account=General&state=Running
command=listVirtualMachines&state=Stopped&response=json
command=listVirtualMachines&id=3a57b2d3-b95a-4892-903a-34f4662ed475&response=json
command=listVirtualMachines&id=3a57b2d3-b95a-4892-903a-34f4662ed475
command=listVirtualMachines&state=Running&response=json

Note: This script requires PowerShell v.3+ due to the use of the Invoke-RestMethod cmdlets.

openstackApiExample.ps1

#
# Name:: openstackApiExample.ps1
# Version:: 0.1.0 (6/27/2016)
# Script Description:: Queries the Datapipe Cloud (Cloud-Stack) REST API
#
# API Documentation:: https://docs.cloud.datapipe.com/developers/api/developers-guide
#
# Author(s):: Otto Helweg
#
# PowerShell v.3+ is required for the Invoke-RestMethod cmdlet
#
# Parameters: -k = apikey, -s = secret (both are required)
# Example: .\apiExample.ps1 -k "F2rrzJiluwK39LpD6PvyF2rrzJiluwK39LpD6PvyF2rrzJiluwK39LpD6PvyF2rrzJiluwK39LpD6PvyF2rrzJ" -s "iluwK39LpD6PvyF2rrzJiluwK39LpD6PvyF2rrzJiluwK39LpD6PvyF2rrzJiluwK39LpD6PvyF2rrzJiluwK3"

param($k,$s)

$uri=@{}
$baseUri = "https://cloud.datapipe.com/api/compute/v1?"
$command = "command=listVirtualMachines"
# The following is a command string that should work, but doesn't
# $command = "command=listVirtualMachines&state=Running"
$uri["apikey"] = $k
$secret = $s

# Build the Command String for getting an authorization signature
# First extract all key/value pairs in the command into the uri hash
$subCommand = $command.split("&")
foreach ($item in $subCommand | Sort-Object) {
  if ($item -like "*=*") {
    $items = $item.Split("=")
    $uri[$items[0]] = $items[1]
  } else {
    $uri[$item] = ""
  }
}

# Build the signing String by sorting the command key/values then make lowercase for signing
$signString = ""
foreach ($key in $uri.Keys | Sort-Object) {
  if ($uri[$key]) {
    $signString = $signString + $key + "=" + $uri[$key] + "&"
  } else {
    $signString = $signString + $key + "&"
  }
}
$signString = $signString.ToLower()
$signString = $signString.TrimEnd("&")

# Get the HMAC SHA-1 signature for the specific Command String
$hmacSha = New-Object System.Security.Cryptography.HMACSHA1
$hmacSha.key = [Text.Encoding]::ASCII.GetBytes($secret)
$signature = $hmacSha.ComputeHash([Text.Encoding]::ASCII.GetBytes($signString))
$signature = [Convert]::ToBase64String($signature)

# Build the signed REST URI
$newUri = $baseUri + $command + "&apiKey=" + $uri["apikey"] + "&signature=" + $signature
Write-Host "URI: $newUri"
Write-Host "signString: $signString"
Write-Host "Signature: $signature"

# Query for a list of all VMs
Write-Host "Querying the Cloud-Stack API..."
[xml]$vmList = Invoke-RestMethod -Method GET -Uri $newUri -ContentType "application/xml"

# List all VMs visible by the account
Write-Host ""
Write-Host "Virtual Machines:"
foreach ($vm in $vmList.listvirtualmachinesresponse.virtualmachine) {
  if ($vm.state -eq "Stopped") {
    $color = "yellow"
  } else {
    $color = "white"
  }
  Write-Host -ForegroundColor $color "$($vm.displayname) - $($vm.state)"
}


Enjoy!


Use PowerShell to Refresh CenturyLink Cloud VM Snapshots

Summary: VMs created in the CenturyLink Cloud, can have a snapshot (only 1 per VM), and that snapshot has a maximum life of 10 days. Therefore if it’s necessary to maintain a perpetual snapshot (like for test VMs that have a baseline configuration), VMs need to have their snapshots routinely refreshed. The following PowerShell script leverages the powerful CenturyLink Cloud REST v2 API to automate this process. This script relies on the presence of a ‘bearer token’ for authentication into the CLC API. Details on how to create this ‘bearer token’ can be found in this blog post (as well as details on how to discover your Group ID). The complete reference to CenturyLink’s Cloud REST API can be found here: https://www.ctl.io/api-docs/v2/

This script basically leverages CLC APIs to restore, delete, and create a VM snapshot. After each API is called, the script will wait until the task is complete, by querying the status of the task requested.

Note: This script sample requires PowerShell v4+

Refresh-Snapshot.ps1

#
# Name:: Refresh-Snapshot.ps1
# Version:: 0.1.2 (3/5/2016)
# Script Description:: Refreshes a server's snapshot by restoring the snapshot, deleting it, then creating a new one.
#
# API Documentation:: https://www.ctl.io/api-docs/v2/
#
# Author(s):: Otto Helweg
#

param($s)

# Display help
if (($Args -match "-\?|--\?|-help|--help|/\?|/help") -or !($s)) {
  Write-Host "Usage: Refresh-Snapshot.ps1"
  Write-Host "     -s [server name]       (Required) Server's name according to Centurylink Cloud"
  Write-Host "     -r                     Revert VM to existing snapshot before refreshing"
  Write-Host ""
  Write-Host "EXAMPLES:"
  Write-Host "     Refresh-Snapshot.ps1 -s CA3TESTTEST01 -r"
  Write-Host ""
  exit
}

$goodStatus = @("notStarted","executing","succeeded","resumed")

# PowerShell v4 is required for the REST cmdlets
if (!($psversiontable.PSVersion.Major -ge 4)) {
  Write-Host -ForegroundColor "red" "Requires PowerShell v.4 or greater. Please install the Windows Management Framework 4 or above."
  exit
}

# Check to make sure the Bearer Token is less than 2 weeks old
if (!(Test-Path .\bearerToken.txt)) {
  Write-Host -ForegroundColor Red "Error: Bearer Token file is missing. Run Save-BearerToken.ps1"
  exit
} else {
  $fileInfo = dir .\bearerToken.txt
  if ($fileInfo.LastWriteTime -lt (Get-Date).AddDays(-11)) {
    Write-Host -ForegroundColor Yellow "Warning: Bearer Token file is almost out of date. Run Save-BearerToken.ps1"
  }
  if ($fileInfo.LastWriteTime -lt (Get-Date).AddDays(-13)) {
    Write-Host -ForegroundColor Red "Error: Bearer Token file is out of date. Run Save-BearerToken.ps1"
    exit
  }
}

$bearerTokenInput = Get-Content ".\bearerToken.txt"
$accountAlias = "SXSW"
$bearerToken = " Bearer " + $bearerTokenInput
$header = @{}
$header["Authorization"] = $bearerToken
$serverName = $s

Write-Host -ForegroundColor Green "Getting server properties for $serverName..."
$requestUri = "https://api.ctl.io/v2/servers/$accountAlias/$serverName"
$serverProperties = Invoke-RestMethod -Method GET -Headers $header -Uri $requestUri -ContentType "application/json"

if (!$serverProperties) {
  Write-Host -ForegroundColor Red "Error: $serverName does not appear to exist!"
  exit
}

if (($Args -contains "-r") -and $serverProperties.details.snapshots) {
  Write-Host -ForegroundColor Green "Restoring snapshot for $serverName..."
  $startTime = Get-Date
  $requestUri = "https://api.ctl.io$($serverProperties.details.snapshots.links.href[0])/restore"
  $restoreResult = Invoke-RestMethod -Method POST -Headers $header -Uri $requestUri -ContentType "application/json"
  $statusUri = "https://api.ctl.io/v2/operations/$accountAlias/status/$($restoreResult.id)"
  $continue = $true
  Write-Host "Waiting for snapshot restore to complete..."
  while ($continue) {
    $statusResult = Invoke-RestMethod -Method GET -Headers $header -Uri $statusUri -ContentType "application/json"
    [int]$elapsedSeconds = ($(Get-Date) - $startTime).TotalSeconds
    Write-Host "   [$elapsedSeconds seconds] $($statusResult.status)"
    if ($statusResult.status -eq "succeeded") {
      $continue = $false
    }
    if ($statusResult.status -notin $goodStatus) {
      Write-Host -ForegroundColor Red "Error: Restoring snapshot for $serverName failed!"
      exit
    }
    Sleep 2
  }
}

if ($serverProperties.details.snapshots) {
  Write-Host -ForegroundColor Green "Deleting snapshot for $serverName..."
  $startTime = Get-Date
  $requestUri = "https://api.ctl.io$($serverProperties.details.snapshots.links.href[0])"
  $restoreResult = Invoke-RestMethod -Method DELETE -Headers $header -Uri $requestUri -ContentType "application/json"
  $statusUri = "https://api.ctl.io/v2/operations/$accountAlias/status/$($restoreResult.id)"
  $continue = $true
  Write-Host "Waiting for snapshot delete to complete..."
  while ($continue) {
    $statusResult = Invoke-RestMethod -Method GET -Headers $header -Uri $statusUri -ContentType "application/json"
    [int]$elapsedSeconds = ($(Get-Date) - $startTime).TotalSeconds
    Write-Host "   [$elapsedSeconds seconds] $($statusResult.status)"
    if ($statusResult.status -eq "succeeded") {
      $continue = $false
    }
    if ($statusResult.status -notin $goodStatus) {
      Write-Host -ForegroundColor Red "Error: Deleting snapshot for $serverName failed!"
      exit
    }
    Sleep 2
  }
}

Write-Host -ForegroundColor Green "Creating snapshot for $serverName..."
$startTime = Get-Date
$createBody = "{
  ""snapshotExpirationDays"":""10"",
  ""serverIds"":[
      ""$serverName""
    ]
}"

$requestUri = "https://api.ctl.io/v2/operations/$accountAlias/servers/createSnapshot"
$restoreResult = Invoke-RestMethod -Method POST -Headers $header -Body $createBody -Uri $requestUri -ContentType "application/json"
$statusUri = "https://api.ctl.io/v2/operations/$accountAlias/status/$($restoreResult.links.id)"

$continue = $true
Write-Host "Waiting for snapshot creation to complete..."
while ($continue) {
  $statusResult = Invoke-RestMethod -Method GET -Headers $header -Uri $statusUri -ContentType "application/json"
  [int]$elapsedSeconds = ($(Get-Date) - $startTime).TotalSeconds
  Write-Host "   [$elapsedSeconds seconds] $($statusResult.status)"
  if ($statusResult.status -eq "succeeded") {
    $continue = $false
  }
  if ($statusResult.status -notin $goodStatus) {
    Write-Host -ForegroundColor Red "Error: Creating snapshot for $serverName failed!"
    exit
  }
  Sleep 2
}


Enjoy!

Ansible vs. Chef for Managing Windows

ConfigureRemotingForAnsible.ps1Summary: Ansible is a simple and powerful application/DevOps framework for managing Windows configuration and provisioning. Getting off the ground with Ansible was also fairly straightforward and doesn’t require a large time or infrastructure investment.

These are some initial thoughts about using Ansible to manage the Windows platform (specifically compared to Chef). This analysis does not consider the ways in which Chef might be a better choice than Ansible for Windows management (they do exist and might be the subject of another blog post in the future).

The Ansible pilot was setup to be able to mimic some existing Chef recipes in order to determine time investment and infrastructure requirements as well as Ansible capabilities. The pilot consisted of an Ansible server (CentOS 6 – 64bit) and a Windows server (Windows Server 2012 Standard Edition) to be managed. Findings were as follows (in no particular order):

Note: Ansible Module  = Chef Resource, Ansible Playbook = Chef Recipe

  • Agentless: Ansible does not use an agent to manage Windows, but merely uses Windows’ built in Windows Remote Management (WinRM) protocol and framework.
  • WinRM Configuration: The PowerShell script ConfigureRemotingForAnsible.ps1 needs to be run on the managed node in order to enable communication with the Ansible server. The script basically configures a custom HTTPS listener with a special certificate.
  • PowerShell 3.0: PowerShell 3.0 or above is required by Ansible. With PowerShell 3.0, the following Hotfix KB2842230 may also need to be installed. On the other hand, Chef works well with PowerShell 2.0. PowerShell 3.0 can be easily updated on versions of Windows Server (pre 2012 came with PowerShell 2.0) by installing the Windows Management Framework (WMF) 3.0.
  • Predictable Execution: Ansible playbooks have a single execution phase, rather than Chef’s compile then execute phases, which, in some cases, can make Chef recipes less predictable. For example in Chef, modifying an environmental variable several times on a managed node within a single run_list will produce unexpected results.
  • Fewer Facts: Far fewer Ansible Facts are discovered at runtime than Ohai Attributes for a Windows host (this is not so with Linux). Chef’s Ohai discovers the same mountain of properties on both Windows and Linux.
  • Parameters: Parameters can be passed into the Ansible Playbook from the command line which is useful for changing Playbook behavior when it’s executed.
  • PowerShell: Ansible runs pure PowerShell scripts “as is”. Chef requires PowerShell scripts to be slightly modified by escaping certain characters. Ansible also simply manages the transfer of the script to the managed node, script execution, and script removal.
  • External File Transfers: The Ansible URL module nicely transfers big files via a URL. This is convenient when using Artifactory or Pydio to pull down large binaries for installation or processing.
  • Unzipping Files: The Ansible ZIP module is simple to use and nicely expands compressed files on the managed node.
  • Variable Passing: Variables can be easily passed out of a PowerShell script to the Playbook (or other modules) during runtime. This is useful when PowerShell is used to dynamically gather or process needed data at runtime. Although Chef easily allows for the passing of Attributes into PowerShell scripts, pulling data back out of those scripts is tricky.
  • Windows Update Works! The Windows Update module works (no permissions issues, I don’t know how Ansible is accomplishing this because this is a known issue with Chef). The problem lies in Windows not granting access to certain internal methods when accessed remotely, even with Administrator credentials. To see how this can be overcome with Chef, go to this blog post on the topic.
  • Reboot Management: Ansible playbooks can easily manage reboots since the Playbook is being run from the Ansible server and not the Node.
  • User Input: An Ansible Playbook can take user input during runtime. For example getting runtime credentials when joining a Windows node to a domain.

Windows Update Playbook Example:

---
# This playbook installs Windows updates
# Run with the following command:
#   ansible-playbook update-win.yml --ask-pass --u Administrator

- name: Configure Server
  hosts: windows
  gather_facts: true
  tasks:
    - name: Install Windows updates
      win_updates:
        category_names: ['SecurityUpdates','CriticalUpdates','UpdateRollups','Updates']

    - name: Restart machine
      raw: shutdown /r /f /c "Ansible updates triggered"
      async: 0
      poll: 0
      ignore_errors: true

    - name: Waiting for server to come back
      local_action: wait_for
                    host={{ inventory_hostname }}
                    state=started
                    timeout=60
      sudo: false

Windows Domain Join Playbook Example:

---
# This playbook joins Windows to a domain
# Run with the following command:
#   ansible-playbook joindomain-win.yml --ask-pass --u Administrator


- name: Join domain
  hosts: windows
  gather_facts: true
  vars_prompt:
    - name: "user"
      prompt: "Domain Join username"
      private: no
    - name: "password"
      prompt: "Domain Join password"
      private: yes
  tasks:
    - name: Join domain script
      script: "files/join-domain.ps1 -u '{{ user }}' -p '{{ password }}'"
      ignore_errors: true

    - name: Waiting for server to come back
      local_action: wait_for
                    host={{ inventory_hostname }}
                    state=started
                    timeout=60
      sudo: false

Windows Domain Join PowerShell Script Example:

#
# Script:: join-domain.ps1
# Joins a sesrver to a domain
#

param($u,$p)

$securePassword = ConvertTo-SecureString -String $p -AsPlainText -Force
$psCreds = new-object -typename System.Management.Automation.PSCredential -argumentlist $u, $securePassword


$domainCheck = (Get-WmiObject -Class win32_computersystem).Domain
if (!($domainCheck -eq "contoso.com")) {
  Add-Computer -DomainName "contoso.com" -Credential $psCreds -Force -Restart

  eventcreate /t INFORMATION /ID 1 /L APPLICATION /SO "Ansible-Playbook" /D "joindomain-win: Added to the domain 'contoso.com'."
}

Enjoy!

Apply Windows Updates Via a Chef Recipe

Summary

Using Chef (or any other remote management tool for that matter – like Windows Remote Management or PowerShell Remoting) to apply Windows updates to a remote system is difficult because some of the Windows Update methods will not work when executed from a remote connection, even if you’re using Administrator level credentials (this is apparently a feature, not a bug). To get around this, the Chef recipe must launch the update commands via a task in Task Scheduler. This can be done by configuring the Task Scheduler task to call the Chef recipe via the local ‘chef-client’ utility.

In this example I’m creating a task to ‘run once’, but since it’s in the past, this task will never get executed on its own. Then I’m manually launching the newly created task, which just calls the Chef Client to run my InstallWindowsUpdates cookbook (recipe: default.rb).

Create/Execute Task via PowerShell Remoting Example:

Invoke-Command -ComputerName <server name> -Credential <admin credentials> -ScriptBlock { cmd /c "schtasks /Create /RU System /RL HIGHEST /F /TR ""c:\opscode\chef\bin\chef-client.bat -o InstallWindowsUpdates"" /TN ChefInstallUpdates /SC Once /ST 00:00 2>&1" }
Invoke-Command -ComputerName <server name> -Credential <admin credentials> -ScriptBlock { cmd /c "schtasks /run /tn ChefInstallUpdates 2>&1" }

Windows Update Recipe Example (default.rb):

#
# Cookbook Name:: InstallWindowsUpdates
# Recipe:: default
# Author(s):: Otto Helweg
#

# Configures Windows Update automatic updates
powershell_script "install-windows-updates" do
  guard_interpreter :powershell_script
  # Set a 2 hour timeout
  timeout 7200
  code <<-EOH
    Write-Host -ForegroundColor Green "Searching for updates (this may take up to 30 minutes or more)..."

    $updateSession = New-Object -com Microsoft.Update.Session
    $updateSearcher = $updateSession.CreateupdateSearcher()
    try
    {
      $searchResult =  $updateSearcher.Search("Type='Software' and IsHidden=0 and IsInstalled=0").Updates
    }
    catch
    {
      eventcreate /t ERROR /ID 1 /L APPLICATION /SO "Chef-Cookbook" /D "InstallWindowsUpdates: Update attempt failed."
      $updateFailed = $true
    }

    if(!($updateFailed)) {
      foreach ($updateItem in $searchResult) {
        $UpdatesToDownload = New-Object -com Microsoft.Update.UpdateColl
        if (!($updateItem.EulaAccepted)) {
          $updateItem.AcceptEula()
        }
        $UpdatesToDownload.Add($updateItem)
        $Downloader = $UpdateSession.CreateUpdateDownloader()
        $Downloader.Updates = $UpdatesToDownload
        $Downloader.Download()
        $UpdatesToInstall = New-Object -com Microsoft.Update.UpdateColl
        $UpdatesToInstall.Add($updateItem)
        $Title = $updateItem.Title
        Write-host -ForegroundColor Green "  Installing Update: $Title"
        $Installer = $UpdateSession.CreateUpdateInstaller()
        $Installer.Updates = $UpdatesToInstall
        $InstallationResult = $Installer.Install()
        eventcreate /t INFORMATION /ID 1 /L APPLICATION /SO "Chef-Cookbook" /D "InstallWindowsUpdates: Installed update $Title."
      }

      if (!($searchResult.Count)) {
        eventcreate /t INFORMATION /ID 999 /L APPLICATION /SO "Chef-Cookbook" /D "InstallWindowsUpdates: No updates available."
      }
      eventcreate /t INFORMATION /ID 1 /L APPLICATION /SO "Chef-Cookbook" /D "InstallWindowsUpdates: Done Installing Updates."
    }
  EOH
  action :run
end

Enjoy!

Using PowerShell to Pause CenturyLink Cloud Virtual Servers

Summary

The following script will pause all servers in the specified group for the account alias ‘SXSW’. You can discover your Group ID by querying an existing server (see example towards the end of this blog post). Pausing your Virtual Servers in the CenturyLink Cloud merely saves their state (memory and disk) and can easily be resumed by Starting them (unlike shutting them down or turning them off which does not save the state of their memory). Pausing servers is similar to ‘sleep’ mode supported by most computers. This can be useful for reducing your CLC costs when virtual servers are not being used. This script reads the necessary BearerToken credentials from a text file (bearerToken.txt) that is created by the following script (keep in mind that this token has a life of only 2 weeks and will then need to be regenerated):

Note: All of these script samples are using PowerShell v4 (required)

Example: Save-BearerToken.ps1
if (!($psversiontable.PSVersion.Major -ge 4)) {
 Write-Host -ForegroundColor Red "Requires PowerShell v.4 or greater. Please install the Windows Management Framework 4 or above."
 exit
}

$psCreds = Get-Credential -Message "Use CLC Web Portal Credentials"
$creds = @{
 username = $psCreds.username
 password = $psCreds.GetNetworkCredential().Password
}
$creds = $creds | ConvertTo-Json

Write-Host -ForegroundColor "green" "Getting authentication 'bearerToken'..."
$logonUri = "https://api.ctl.io/v2/authentication/login"
$logonResponse = Invoke-RestMethod -Method Post -Uri $logonUri -Body $creds -ContentType "application/json"

Write-Host -ForegroundColor "green" "Account Summary:"
$logonResponse

Write-Host -ForegroundColor "green" "Bearer Token (2 week TTL):"
$logonResponse.bearerToken
$logonResponse.bearerToken | Set-Content "bearerToken.txt"
Example: Pause-Servers.ps1
$bearerTokenInput = Get-Content ".\bearerToken.txt"
$groupId = "7c3a1aee32241223a1aee32241979a28"
$accountAlias = "SXSW"
$bearerToken = " Bearer " + $bearerTokenInput
$header = @{}
$header["Authorization"] = $bearerToken

# Discover all servers in the specified group
$requestUri = "https://api.ctl.io/v2/groups/$accountAlias/$groupId"
$groupOutput = Invoke-RestMethod -Method GET -Headers $header -Uri $requestUri -ContentType "application/json" -SessionVariable "theSession"

$serverArray = @()
$serverPause = @()
foreach ($item in $groupOutput.links) {
  if ($item.rel -eq "server") {
    $serverName = $item.href.split("/")[($item.href.split("/").count - 1)]
    $serverArray = $serverArray + ($serverName)
  }
}

# Gather server status
$serverList = ""
foreach ($serverName in $serverArray) {
  Write-Host -ForegroundColor Green "Getting server properties for $serverName..."
  $requestUri = "https://api.ctl.io/v2/servers/$accountAlias/$serverName"
  $serverProperties = Invoke-RestMethod -Method GET -Headers $header -Uri $requestUri -ContentType "application/json" -SessionVariable "theSession"
  $powerState = $serverProperties.details.powerState
  Write-Host -ForegroundColor Green "  PowerState: $powerState"
  if ($serverProperties.details.powerState -eq "started") {
    Write-Host -ForegroundColor Yellow "  Pausing $serverName"
    $serverPause = $serverPause + ($serverName)
    $serverList = "$serverList, $serverName"
  }
}

$serverList = $serverList.TrimStart(", ")
if ($serverPause.Count -eq 1) {
  $servers = "[ ""$serverPause"" ]"
} else {
  $servers = $serverPause | ConvertTo-Json
}

Write-Host -ForegroundColor Green "Sending Server pause request for $serverList"
Write-Host "servers: $servers"
Write-Host "serverPause: $serverPause"
$requestUri = "https://api.ctl.io/v2/operations/$accountAlias/servers/pause"
$pauseRequest = Invoke-RestMethod -Method POST -Headers $header -Uri $requestUri -Body $servers -ContentType "application/json" -SessionVariable "theSession"

Write-Host "Request Output: $pauseRequest"

Getting Your Group ID From Your Server

The following sample script will retrieve your Group ID from an existing server. You will need to incorporate your specific server name in this script (we use ‘CA3TESTTEST01’).

Example: List-ServerGroup.ps1
if (!($psversiontable.PSVersion.Major -ge 4)) {
  Write-Host -ForegroundColor Red "Requires PowerShell v.4 or greater. Please install the Windows Management Framework 4 or above."
  exit
}
$dataCenter = "CA3"
$serverName = "CA3TESTTEST01"
$psCreds = Get-Credential -Message "Use CLC Web Portal Credentials"
$creds = @{
 username = $psCreds.username
 password = $psCreds.GetNetworkCredential().Password
}
$creds = $creds | ConvertTo-Json

$headers = New-Object "System.Collections.Generic.Dictionary[[String],[String]]"

Write-Host -ForegroundColor "green" "Getting authentication 'bearerToken'..."
$logonUri = "https://api.ctl.io/v2/authentication/login"
$logonResponse = Invoke-RestMethod -Method Post -Headers $headers -Uri $logonUri -Body $creds -ContentType "application/json" -SessionVariable "theSession"

$bearerToken = " Bearer " + $logonResponse.bearerToken
$accountAlias = $logonResponse.accountAlias

$headers.Add("Authorization",$bearerToken)

Write-Host -ForegroundColor "green" "Getting datacenter capabilities for $dataCenter..."
$RequestUri = "https://api.ctl.io/v2/datacenters/$accountAlias/CA3/deploymentCapabilities"
$deployCapabilities = Invoke-RestMethod -Method GET -Headers $headers -Uri $RequestUri -ContentType "application/json" -SessionVariable "theSession"

Write-Host -ForegroundColor "green" "This datacenter supports the following platform templates:"
$deployCapabilities.templates
Output:

CLC Output 3

Extra: Task Scheduler Rule

The following is a rule that can be imported into Task Scheduler to run the above script on a regular basis.

<?xml version="1.0" encoding="UTF-16"?>
<Task version="1.2" xmlns="http://schemas.microsoft.com/windows/2004/02/mit/task">
<RegistrationInfo>
<Date>2015-06-19T10:56:50.2629119</Date>
<Author>CA3SXSWTEST01\Administrator</Author>
</RegistrationInfo>
<Triggers>
<CalendarTrigger>
<StartBoundary>2015-06-19T19:00:00</StartBoundary>
<Enabled>true</Enabled>
<ScheduleByDay>
<DaysInterval>1</DaysInterval>
</ScheduleByDay>
</CalendarTrigger>
</Triggers>
<Principals>
<Principal id="Author">
<UserId>CA3SXSWTEST01\Administrator</UserId>
<LogonType>Password</LogonType>
<RunLevel>LeastPrivilege</RunLevel>
</Principal>
</Principals>
<Settings>
<MultipleInstancesPolicy>IgnoreNew</MultipleInstancesPolicy>
<DisallowStartIfOnBatteries>true</DisallowStartIfOnBatteries>
<StopIfGoingOnBatteries>true</StopIfGoingOnBatteries>
<AllowHardTerminate>true</AllowHardTerminate>
<StartWhenAvailable>false</StartWhenAvailable>
<RunOnlyIfNetworkAvailable>false</RunOnlyIfNetworkAvailable>
<IdleSettings>
<StopOnIdleEnd>true</StopOnIdleEnd>
<RestartOnIdle>false</RestartOnIdle>
</IdleSettings>
<AllowStartOnDemand>true</AllowStartOnDemand>
<Enabled>true</Enabled>
<Hidden>false</Hidden>
<RunOnlyIfIdle>false</RunOnlyIfIdle>
<WakeToRun>false</WakeToRun>
<ExecutionTimeLimit>P3D</ExecutionTimeLimit>
<Priority>7</Priority>
</Settings>
<Actions Context="Author">
<Exec>
<Command>powershell.exe</Command>
<Arguments>.\Pause-Servers.ps1</Arguments>
<WorkingDirectory>C:\Users\Administrator\Documents\Scripts</WorkingDirectory>
</Exec>
</Actions>
</Task>

Enjoy!

PowerShell and the CenturyLink Cloud API

Summary

CenturyLink has a powerful REST API for automating the provisioning and management of virtual servers in their environment. And since PowerShell v4 now has cmdlets that support interacting with REST APIs, it is an easy way to work with entities in the CenturyLink Cloud. The following post will cover the steps required (and sample code) to use PowerShell to provision a CenturyLink Cloud virtual server. Plain old Internet connectivity is all that’s required between PowerShell and CenturyLink, since their API is on the open Internet. The complete reference to CenturyLink’s Cloud REST API can be found here: https://www.ctl.io/api-docs/v2/

Steps:

  1. Get a free account for CenturyLink Cloud here: https://www.centurylinkcloud.com/
  2. Get your Account Alias
  3. Get your Group ID (Default Group)
  4. Query for the capabilities of your desired datacenter (you can find a list of datacenters from the CenturyLink Cloud Control Portal here: https://control.ctl.io/)
  5. Create your server!

Note: All of these script samples are using PowerShell v4 (required)

Get Your Account Alias

Once you get your CenturyLink account, you set your account alias to an abbreviation between 2 and 4 characters. You can also get your AccountAlias from the REST API logon response. You also need to get the BearerToken from the logon response to use as your authentication mechanism with communicating with the CenturyLink REST API (a bearer token has a life of 2 weeks, so don’t hard code it into your scripts).

Example: LogonResponse.ps1
if (!($psversiontable.PSVersion.Major -ge 4)) {
  Write-Host -ForegroundColor "red" "Requires PowerShell v.4 or greater. Please install the Windows Management Framework 4 or above."
  exit
}
 
$psCreds = Get-Credential -Message "Use CLC Web Portal Credentials"
$creds = @{
 username = $psCreds.username
 password = $psCreds.GetNetworkCredential().Password
}
$creds = $creds | ConvertTo-Json
 
$headers = New-Object "System.Collections.Generic.Dictionary[[String],[String]]"
 
Write-Host -ForegroundColor "green" "Getting authentication 'bearerToken'..."
$logonUrl = "https://api.ctl.io/v2/authentication/login"
$logonResponse = Invoke-RestMethod -Method Post -Headers $headers -Uri $logonUrl -Body $creds -ContentType "application/json" -SessionVariable "theSession"
 
Write-Host -ForegroundColor "green" "Account Summary:"
$logonResponse
 
Write-Host -ForegroundColor "green" "Bearer Token (2 week TTL):"
$logonResponse.bearerToken
Output:
PS-CLC Output 1

Find the Default Group for Your Server

This example is going to use your account’s datacenter “Default Group” as the destination for your new server, specifically for the datacenter ‘CA3’ (in Calgary, Canada). Any group can be used, but your account will have a “Default Group” for each datacenter your account can access. This group ID is required in order to identify the destination for your new server.

Example:  GetDefaultDatacenter.ps1
$psCreds = Get-Credential -Message "Use CLC Web Portal Credentials"
$creds = @{
 username = $psCreds.username
 password = $psCreds.GetNetworkCredential().Password
}
$creds = $creds | ConvertTo-Json

$headers = New-Object "System.Collections.Generic.Dictionary[[String],[String]]"

# Write-Host -ForegroundColor "green" "Getting authentication 'bearerToken'..."
$logonUrl = "https://api.ctl.io/v2/authentication/login"
$logonResponse = Invoke-RestMethod -Method Post -Headers $headers -Uri $logonUrl -Body $creds -ContentType "application/json" -SessionVariable "theSession"

$dataCenter = "CA3"
$bearerToken = " Bearer " + $logonResponse.bearerToken
$accountAlias = $logonResponse.accountAlias

$headers.Add("Authorization",$bearerToken)

Write-Host -ForegroundColor Green "Getting datacenter groups for $dataCenter..."
$requestURL = "https://api.ctl.io/v2/datacenters/$accountAlias/CA3?groupLinks=true"
$datacenterLinks = Invoke-RestMethod -Method GET -Headers $headers -Uri $requestURL -ContentType "application/json" -SessionVariable "theSession"
Write-Host "Available links:"
Write-Host $datacenterLinks.links

foreach ($link in $datacenterLinks.links) {
  if ($link.rel -eq "group") {
    Write-Host -ForegroundColor Green "Getting default datacenter group for group $($link.id)..."
    $requestURL = "https://api.ctl.io/v2/groups/$accountAlias/$($link.id)"
    $datacenterGroups = Invoke-RestMethod -Method GET -Headers $headers -Uri $requestURL -ContentType "application/json" -SessionVariable "theSession"
    foreach ($group in $datacenterGroups.Groups) {
      if ($group.type -eq "default") {
        Write-Host "Found group:"
        Write-Host $group
        Write-Host "`n"
        Write-Host -ForegroundColor Green "Default Group for $($dataCenter): $($group.id)"
      }
    }
  }
}
Output:

PS-CLC Output 2

Query for the Capabilities of Your Desired Datacenter

You can also get a list of available datacenters through the API with the following URI: https://api.ctl.io/v2/datacenters/yourAccountAlias. For this example we’re going to query CA3 (Canada – Toronto). As of this writing, the list includes: CA1, CA2, CA3, DE1, GB1, GB3, IL1, NY1, SG1, UC1, UT1, VA1, WA1. You will want to select the desired platform for your virtual server from the datacenter’s available templates as well as the ID of your destination network. If you don’t have any networks yet, the easiest way to create on is to first deploy a virtual server through the Control Portal web site. This can also be created through the API, but for the sake of brevity, we’ll use a network that already exists.

Partial Example (using the results from logonResponse.ps1): Query the Datacenter
$bearerToken = " Bearer " + $logonResponse.bearerToken
$accountAlias = $logonResponse.accountAlias
 
$headers.Add("Authorization",$bearerToken)
 
Write-Host -ForegroundColor "green" "Getting datacenter capabilities for $dataCenter..."
$RequestURL = "https://api.ctl.io/v2/datacenters/$accountAlias/CA3/deploymentCapabilities"
$deployCapabilities = Invoke-RestMethod -Method GET -Headers $headers -Uri $RequestURL -ContentType "application/json" -SessionVariable "theSession"
 
Write-Host -ForegroundColor "green" "This datacenter supports the following platform templates:"
$deployCapabilities.templates
 
Write-Host -ForegroundColor "green" "This datacenter supports the following networks:"
$deployCapabilities.deployableNetworks
Output

CLC Output 2

Finally, Create Your Server

After gathering the destination group (default group for this example), provisioning template (sourceServerId) and the destination network, you can use the following script to create your virtual server in the CenturyLink Cloud.

Note: There is a character limitation for the ‘name’ field (6 I believe but this example uses a 4 character name).

Example: CreateServer.ps1
$server = @{
  name = "test"
  description = "My test server"
  groupId = "7c39b8a1aee32241979a282241979a28"
  sourceServerId = "WIN2012R2DTC-64"
  isManagedOS = "false"
  networkId = "7J3aCCm0GGF5ev4cmh6U58279b6f056a"
  password = "SomePassword!"
  cpu = 2
  memoryGB = 4
  type = "standard"
  storageType = "standard"
}
$server = $server | ConvertTo-Json
 
$psCreds = Get-Credential -Message "Use CLC Web Portal Credentials"
$creds = @{
 username = $psCreds.username
 password = $psCreds.GetNetworkCredential().Password
}
$creds = $creds | ConvertTo-Json
 
$headers = New-Object "System.Collections.Generic.Dictionary[[String],[String]]"
 
Write-Host -ForegroundColor "green" "Getting authentication 'bearerToken'..."
$logonUrl = "https://api.ctl.io/v2/authentication/login"
$logonResponse = Invoke-RestMethod -Method Post -Headers $headers -Uri $logonUrl -Body $creds -ContentType "application/json" -SessionVariable "theSession"
 
$bearerToken = " Bearer " + $logonResponse.bearerToken
$accountAlias = $logonResponse.accountAlias
 
$headers.Add("Authorization",$bearerToken)
 
Write-Host -ForegroundColor "green" "Sending Server build request..."
$requestURL = "https://api.ctl.io/v2/servers/$accountAlias"
$buildRequest = Invoke-RestMethod -Method POST -Headers $headers -Uri $requestURL -Body $server -ContentType "application/json" -SessionVariable "theSession"
 
Write-Host -ForegroundColor "green" "Request Output:"
Write-Host -ForegroundColor "green" "Server Name:"
$buildRequest.server
Write-Host -ForegroundColor "green" "Is Queued?"
$buildRequest.isQueued
Write-Host -ForegroundColor "green" "Queue Status Links:"
$buildRequest.links
Output

PS-CLC Output 4

Enjoy!

Chef and PowerShell DSC Overview

Summary

PowerShell DSC is a very valuable extension to Chef Cookbooks for configuring and provisioning Windows Nodes for the following reasons:

  • It can be assumed that DSC Resources will be updated sooner, more stable, and more powerful than the equivalent Windows specific Chef Resources. Primarily because many of the DSC Resources are developed by Microsoft, for Microsoft platforms and applications.
  • Base DSC Resources (e.g. ‘file’, ‘registry’, ‘environment’, ‘script’, ‘feature’) are available by default to Chef Recipes for Nodes that have the Windows Management Framework v.4 (WMF 4) installed.
  • DSC includes a wealth of extension Resources that can simplify and stabilize a Chef recipe when installing or configuring Windows platform components.
  • Chef makes it easier to leverage DSC Resources than a traditional PowerShell DSC infrastructure for the following reasons:
    • No DSC server is required
    • DSC extension Resources don’t require implementation on the server (packaging and checksums need to be manually created for each extension Resource)
    • The Node doesn’t need to be configured for as a DSC Node (WMF v.4+ is still required on the Node)
    • DSC Resources can be executed on the fly by Chef-Client on the Node (rather than waiting for the COM objects to get exercised by the DSC Scheduled Tasks which can lead to inconsistent results when invoked manually)

Considerations:

  • Chef-Client v.12+ is required on the Node
  • WMF v.4+ is required on the Node
  • Using the Chef Resource ‘dsc_resource’ requires WMF v.5+ (this analysis is focusing on the Chef Resource ‘dsc_script’). WMF 5 won’t RTM until Windows 10, but will be available downlevel to Windows Server 2008 and beta versions are currently available down to Windows Server 2008 R2
  • Using DSC extension Resources requires DSC extension Resource management within the cookbook (e.g. by using the Chef Resource ‘remote_diretory’ in order to make sure DSC extension Resources are available on the Node when called by the Chef Recipe) where this is handled automatically be DSC Server infrastructure.

Chef Resource and DSC Resource Comparison

The following comparison is not meant to argue the benefit of using DSC Resources over Chef Resources, rather these examples are meant to demonstrate the difference in code complexity when performing Windows platform actions from Chef vs. the PowerShell DSC server. Considering whether or not to use DSC Resources might also include weighing the decision to develop recipes that are platform dependent since there are no plans for DSC Resources to include platforms other than Windows. In addition, these examples don’t include any Chef Resources other than the ‘powershell_script’ Resource. There are many Windows specific Chef resources that can also simplify Chef Recipes.

The following examples demonstrate enabling remote access via RDP to the Node.

Example: Leveraging the Chef ‘powershell_script’ Resource
# Enables remote desktop access to the server
powershell_script "enable-remote-desktop" do
  guard_interpreter :powershell_script
  code <<-EOH
    Set-ItemProperty -Path 'HKLM:\\System\\CurrentControlSet\\Control\\Terminal Server' -name "fDenyTSConnections" -Value 0
    Enable-NetFirewallRule -DisplayGroup "Remote Desktop"
    Set-ItemProperty -Path 'HKLM:\\System\\CurrentControlSet\\Control\\Terminal Server\\WinStations\\RDP-Tcp' -name "UserAuthentication" -Value 1
    eventcreate /t INFORMATION /ID 2 /L APPLICATION /SO "Chef-Client" /D "Enabled Remote Desktop access"
  EOH
  only_if <<-EOH
    if ((Get-ItemProperty -Path 'HKLM:\\System\\CurrentControlSet\\Control\\Terminal Server').fDenyTSConnections -ne "0") {
      $true
    } elseif ((Get-NetFirewallRule -Name "RemoteDesktop-UserMode-In-TCP").Enabled -ne "True") {
      $true
    } elseif ((Get-ItemProperty -Path 'HKLM:\\System\\CurrentControlSet\\Control\\Terminal Server\\WinStations\\RDP-Tcp').UserAuthentication -ne "1") {
      $true
    } else {
      $false
    }
  EOH
end
Example: PowerShell DSC Script (Recipe) Using a DSC Resource
# Enables remote desktop access to the server via an experimental resource xRemoteDesktopAdmin
xRemoteDesktopAdmin EnableRDP
{
  Ensure = "Present"
  UserAuthentication = "Secure"
}
 
xFirewall AllowRDP
{
    Name = 'DSC - Remote Desktop Admin Connections'
    DisplayGroup = "Remote Desktop"
    Ensure = 'Present'
    State = 'Enabled'
    Access = 'Allow'
    Profile = ("Domain", "Private", "Public")
}
Example: Chef Recipe Using a DSC Resource from ‘dsc_script’
dsc_script "Configure Server" do
  imports 'xRemoteDesktopAdmin'
  imports 'xNetworking'
  code <<-SITESDSC
    # Enables remote desktop access to the server via an experimental resource xRemoteDesktopAdmin
    xRemoteDesktopAdmin EnableRemoteDesktop
    {
      Ensure = "Present"
      UserAuthentication = "Secure"
    }
 
    xFirewall AllowRDP
    {
        Name = 'DSC - Remote Desktop Admin Connections'
        DisplayGroup = "Remote Desktop"
        Ensure = 'Present'
        State = 'Enabled'
        Access = 'Allow'
        Profile = ("Domain", "Private", "Public")
    }
  SITESDSC
end
Example: Adding DSC Resource Extension Management in Chef Recipes

The following Chef Recipe snipit demonstrates how 2 DSC extension Resources are managed on the Node. The ‘remote_directory’ merely insures that the ‘xRemoteDesktopAdmin’ and ‘xNetworking’ resources are installed on the Node so they can be leveraged by the Chef Recipe.

remote_directory "C:\\Program Files\\WindowsPowerShell\\Modules\\xRemoteDesktopAdmin" do
  source "xRemoteDesktopAdmin"
  action :create
end
 
remote_directory "C:\\Program Files\\WindowsPowerShell\\Modules\\xNetworking" do
  source "xNetworking"
  action :create
end
Appendix: Full Chef Recipe ‘dsc_script.rb’

The following recipe performs actions on a Windows Server that fall under the topic of general server configuration.

# Requires Chef-Client v.12+
# Author: Otto Helweg
 
include_recipe 'ws2012r2::lcm_setup_dsc_script'
 
remote_directory "C:\\Program Files\\WindowsPowerShell\\Modules\\xRemoteDesktopAdmin" do
  source "xRemoteDesktopAdmin"
  action :create
end
 
remote_directory "C:\\Program Files\\WindowsPowerShell\\Modules\\xNetworking" do
  source "xNetworking"
  action :create
end
 
dsc_script "Configure Server" do
  imports 'xRemoteDesktopAdmin'
  imports 'xNetworking'
  code <<-SITESDSC
    # Leaves a timestamp indicating the last time this recipe was run on the node (this resource in intentionally not idempotent)
    Environment LeaveTimestamp
    {
      Ensure = "Present"
      Name = "DSCClientRun"
      Value = "Last PowerShell DSC run (UTC): " + (Get-Date).ToUniversalTime().ToString()
    }
 
    # Enables remote desktop access to the server via an experimental resource xRemoteDesktopAdmin
    xRemoteDesktopAdmin EnableRemoteDesktop
    {
      Ensure = "Present"
      UserAuthentication = "Secure"
    }
 
    xFirewall AllowRDP
    {
        Name = 'DSC - Remote Desktop Admin Connections'
        DisplayGroup = "Remote Desktop"
        Ensure = 'Present'
        State = 'Enabled'
        Access = 'Allow'
        Profile = ("Domain", "Private", "Public")
    }
 
    # Disables checking for updates
    Script DisableUpdates
    {
      SetScript = {
        $WUSettings = (New-Object -com "Microsoft.Update.AutoUpdate").Settings
        $WUSettings.NotificationLevel = 1
        $WUSettings.save()
        eventcreate /t INFORMATION /ID 3 /L APPLICATION /SO "DSC-Client" /D "Disabled Checking for Updates"
      }
      TestScript = {
        $WUSettings = (New-Object -com "Microsoft.Update.AutoUpdate").Settings
        if ($WUSettings.NotificationLevel -ne "1") {
          $false
        } else {
          $true
        }
      }
      GetScript = {
        # Do Nothing
      }
    }
 
    # Verifies Windows Remote Management is Configured or Configures it
    Script EnableWinrm
    {
      SetScript = {
        Set-WSManQuickConfig -Force -SkipNetworkProfileCheck
        eventcreate /t INFORMATION /ID 4 /L APPLICATION /SO "DSC-Client" /D "Enabled Windows Remote Management"
      }
      TestScript = {
        try{
          # Use to remove a listener for testing
          # Remove-WSManInstance winrm/config/Listener -selectorset @{Address="*";Transport="http"}
          Get-WsmanInstance winrm/config/listener -selectorset @{Address="*";Transport="http"}
          return $true
        } catch {
          #$wsmanOutput = "WinRM doesn't seem to be configured or enabled."
          return $false
        }
      }
      GetScript = {
        # Do Nothing
      }
    }
 
    # Installs the Applicaiton-Server Role
    Script InstallAppServer-LogEvent
    {
      SetScript = {
        eventcreate /t INFORMATION /ID 6 /L APPLICATION /SO "DSC-Client" /D "Installed Role: Applicaiton-Server"
      }
      TestScript = {
        if ((Get-WindowsFeature -Name Application-Server).Installed) {
          $true
        } else {
          $false
        }
      }
      GetScript = {
        # Do Nothing
      }
    }
 
    WindowsFeature InstallAppServer-Step1
    {
      Name = "Application-Server"
      Ensure = "Present"
      IncludeAllSubFeature = $true
    }
 
    WindowsFeature InstallAppServer-Step2
    {
      Name = "AS-Web-Support"
      Ensure = "Present"
      IncludeAllSubFeature = $true
      DependsOn = "[WindowsFeature]InstallAppServer-Step1"
    }
 
    # Disables Shutdown tracking (asking for a reason for shutting down the server)
    Script DisableShutdownTracking-LogEvent
    {
      SetScript = {
        eventcreate /t INFORMATION /ID 7 /L APPLICATION /SO "DSC-Client" /D "Disabled Shutdown Tracking"
      }
      TestScript = {
        if ((Get-ItemProperty -Path 'HKLM:\\SOFTWARE\\Policies\\Microsoft\\Windows NT\\Reliability').ShutdownReasonOn -ne "0") {
          $false
        } else {
          $true
        }
      }
      GetScript = {
        # Do Nothing
      }
    }
 
    Registry DisableShutdownTracking
    {
      Ensure = "Present"
      Key = "HKEY_LOCAL_MACHINE\\SOFTWARE\\Policies\\Microsoft\\Windows NT\\Reliability"
      ValueName = "ShutdownReasonOn"
      ValueData = "0"
      ValueType = "Dword"
      Force = $true
    }
 
    # Disables automatic maintenance
    Script DisableAutomaticMaintenance
    {
      SetScript = {
        $taskList = @("Idle Maintenance","Maintenance Configurator","Manual Maintenance","Regular Maintenance")
        $schTasks = Get-ScheduledTask
        foreach ($task in $schTasks) {
          if (($task.TaskPath -eq "\\Microsoft\\Windows\\TaskScheduler\\") -and ($taskList.Contains($task.TaskName))) {
            Unregister-ScheduledTask -TaskName $task.TaskName -TaskPath "\\Microsoft\\Windows\\TaskScheduler\\" -Confirm:$false
          }
        }
        eventcreate /t INFORMATION /ID 8 /L APPLICATION /SO "DSC-Client" /D "Disables automatic maintenance"
      }
      TestScript = {
        $taskList = @("Idle Maintenance","Maintenance Configurator","Manual Maintenance","Regular Maintenance")
        $schTasks = Get-ScheduledTask
        foreach ($task in $taskList) {
          if ($schTasks.TaskName.Contains($task)) {
            $found = $true
          }
        }
        if ($found = $true) {
          $false
        } else {
          $true
        }
      }
      GetScript = {
        # Do Nothing
      }
    }
  SITESDSC
end

Enjoy!

PowerShell DSC Script Example – Node Configuration

The following PowerShell DSC script was converted from a Chef recipe for Windows located here. It’s easy to see that there’s a lot of similarity to the logic that PowerShell DSC and Chef use regarding their resources and provisioning or configuring as node (server). PowerShell DSC adds an additional feature in their Script Resource called ‘GetScript’ which handles gathering information from the Node (not used in this example) for use elsewhere in the Script Resource (must be passed back as a hash). In addition, idempotency is managed by ‘TestScipt’ passing back either $true or $false, where $false will cause ‘SetScript’ to execute. Lastly, all variables must be defined within a Script Resource (most commonly a script block) and not outside of the resource, otherwise they will be evaluated and stored at the time of the MOF file generation.

The following script demonstrates some of the server configuration functionality via PowerShell’s new DSC service, and performs the following actions:

  1. Timestamp: A Windows Event is created and an environmental variable is updated to show the last time this recipe was executed on the server.
  2. Enable Remote Desktop: The Remote Desktop (RDP) functionality is enabled.
  3. Disable Windows Updates: Windows automatic updates are disabled (use with caution – unless you have another update process, don’t do this).
  4. Enable Windows Remote Management: The Windows Remote Management functionality is enabled.
  5. Install IIS: The Application Server and Web Server roles are installed and enabled.
  6. Disable Server Reboot Tracking: A minor registry key is added/updated to stop the default practice of asking for a reboot reason on Windows Server.

DSC Publishing Steps:

The following steps are taken to publish a MOF file that’s ready to be consumed by nodes:

  1. PowerShell DSC script is written (below) and executed.
  2. In the current working directory (important!) a MOF file is created, representing the resources called out in the DSC script.
  3. The MOF file is named after the ‘Node’, in a sub-directory named after the ‘Configuration’ call (e.g. in this case it would be named ‘.\ServerConfig\Anybody.mof’)
    The MOF file is copied to the PowerShell DSC server’s hosting directory.
  4. A sister CheckSum file is generated for the newly created MOF file.
  5. Nodes will the download the MOF file via a REST call, specifying a specific MOF file by GUID (a node can only be configured to download a single MOF file). This will be covered in another blog.

DSC Script:

Configuration ServerConfig
{
  Node Anybody
  {
    # Leaves a timestamp indicating the last time this script was run on the node (this resource is intentionally not idempotent)
    Script LeaveTimestamp
    {
      SetScript = {
        $currentTime = Get-Date
        $currentTimeString = $currentTime.ToUniversalTime().ToString()
        [Environment]::SetEnvironmentVariable("DSCClientRun","Last DSC-Client run (UTC): $currentTimeString","Machine")
        eventcreate /t INFORMATION /ID 1 /L APPLICATION /SO "DSC-Client" /D "Last DSC-Client run (UTC): $currentTimeString"
      }
      TestScript = {
        $false
      }
      GetScript = {
        # Do Nothing
      }
    }
 
    # Enables remote desktop access to the server
    Registry EnableRDP-Step1
    {
      Ensure = "Present"
      Key = "HKEY_LOCAL_MACHINE\System\CurrentControlSet\Control\Terminal Server"
      ValueName = "fDenyTSConnections"
      ValueData = "0"
      ValueType = "Dword"
      Force = $true
    }
 
    Registry EnableRDP-Step2
    {
      Ensure = "Present"
      Key = "HKEY_LOCAL_MACHINE\System\CurrentControlSet\Control\Terminal Server\WinStations\RDP-Tcp"
      ValueName = "UserAuthentication"
      ValueData = "1"
      ValueType = "Dword"
      Force = $true
    }
 
    Script EnableRDP
    {
      SetScript = {
        Enable-NetFirewallRule -DisplayGroup "Remote Desktop"
        eventcreate /t INFORMATION /ID 2 /L APPLICATION /SO "DSC-Client" /D "Enabled Remote Desktop access"
      }
      TestScript = {
        if ((Get-NetFirewallRule -Name "RemoteDesktop-UserMode-In-TCP").Enabled -ne "True") {
          $false
        } else {
          $true
        }
      }
      GetScript = {
        # Do Nothing
      }
    }
 
    # Disables checking for updates
    Script DisableUpdates
    {
      SetScript = {
        $WUSettings = (New-Object -com "Microsoft.Update.AutoUpdate").Settings
        $WUSettings.NotificationLevel = 1
        $WUSettings.save()
        eventcreate /t INFORMATION /ID 3 /L APPLICATION /SO "DSC-Client" /D "Disabled Checking for Updates"
      }
      TestScript = {
        $WUSettings = (New-Object -com "Microsoft.Update.AutoUpdate").Settings
        if ($WUSettings.NotificationLevel -ne "1") {
          $true
        } else {
          $false
        }
      }
      GetScript = {
        # Do Nothing
      }
    }
 
    # Verifies Windows Remote Management is Configured or Configures it
    Script EnableWinrm
    {
      SetScript = {
        Set-WSManQuickConfig -Force -SkipNetworkProfileCheck
        eventcreate /t INFORMATION /ID 4 /L APPLICATION /SO "DSC-Client" /D "Enabled Windows Remote Management"
      }
      TestScript = {
        try{
          # Use to remove a listener for testing
          # Remove-WSManInstance winrm/config/Listener -selectorset @{Address="*";Transport="http"}
          Get-WsmanInstance winrm/config/listener -selectorset @{Address="*";Transport="http"}
          return $true
        } catch {
          #$wsmanOutput = "WinRM doesn't seem to be configured or enabled."
          return $false
        }
      }
      GetScript = {
        # Do Nothing
      }
    }
 
    # Installs the Applicaiton-Server Role
    Script InstallAppServer-LogEvent
    {
      SetScript = {
        eventcreate /t INFORMATION /ID 6 /L APPLICATION /SO "DSC-Client" /D "Installed Role: Applicaiton-Server"
      }
      TestScript = {
        if ((Get-WindowsFeature -Name Application-Server).Installed) {
          $true
        } else {
          $false
        }
      }
      GetScript = {
        # Do Nothing
      }
    }
 
    WindowsFeature InstallAppServer-Step1
    {
      Name = "Application-Server"
      Ensure = "Present"
      IncludeAllSubFeature = $true
    }
 
    WindowsFeature InstallAppServer-Step2
    {
      Name = "AS-Web-Support"
      Ensure = "Present"
      IncludeAllSubFeature = $true
      DependsOn = "[WindowsFeature]InstallAppServer-Step1"
    }
 
    # Disables Shutdown tracking (asking for a reason for shutting down the server)
    Script DisableShutdownTracking-LogEvent
    {
      SetScript = {
        eventcreate /t INFORMATION /ID 7 /L APPLICATION /SO "DSC-Client" /D "Disabled Shutdown Tracking"
      }
      TestScript = {
        if ((Get-ItemProperty -Path 'HKLM:\\SOFTWARE\Policies\Microsoft\Windows NT\Reliability').ShutdownReasonOn -ne "0") {
          $false
        } else {
          $true
        }
      }
      GetScript = {
        # Do Nothing
      }
    }
 
    Registry DisableShutdownTracking
    {
      Ensure = "Present"
      Key = "HKEY_LOCAL_MACHINE\SOFTWARE\Policies\Microsoft\Windows NT\Reliability"
      ValueName = "ShutdownReasonOn"
      ValueData = "0"
      ValueType = "Dword"
      Force = $true
    }
  }
}
 
# The MOF filename must be a GUID. It can be any unique GUID and can be generated by the following PowerShell command ([guid]::NewGuid()).
$guid = "45b51dc8-132c-4052-8e3b-479c73d4c9cc"
 
# Create the MOF file from the above PowerShell DSC script
ServerConfig
 
# Used to copy the newly generated MOF file in the Pull Server's publishing location
$mofFile = "c:\dscscripts\ServerConfig\Anybody.mof"
$mofPath = "C:\Program Files\WindowsPowerShell\DscService\Configuration"
$DSCMofFile = $mofPath + "\" + $guid + ".mof"
 
Copy-Item $mofFile -Destination $DSCMofFile
# Generate a CheckSum sister file for the MOF file

 New-DSCCheckSum $DSCMofFile -Force
After the DSC script is executed on the node, New Windows Events should be logged to the configured node (server):

DSC-Example-1

And the following web page should be viewable on the node (server):

DSC-Example-2

The following practices are leveraged in this recipe:
  • A time stamp is logged on the server in order to track every time the script is executed via both a Windows Event and a Machine Environmental Variable (the environmental variable doesn’t refresh until you log out and log back in – is CMD getting cached somewhere?). This might be helpful for troubleshooting issues by correlating with the recipe execution timestamp.
  • A Windows Event is logged every time a resource is executed on the node (server). Event IDs are unique to the resource function.
  • All resources (except the timestamp resource) are idempotent. In other words, logic is in place to insure the resource is not executed if it doesn’t need to be. For example, if IIS has already been installed, then there should be no attempt to install it again. This is a ‘best practice’ for writing DSC scripts.
The following PowerShell functionality is exercised by this recipe:
  • An Environmental Variable is created/updated
  • Events are created with the ‘eventcreate’ command. The PowerShell ‘New-Event’ is not used because for Windows Server (not client) you need to register your custom event source with the server, so ‘eventcreate’ is simpler.
  • A Registry Key is added/updated
  • The Enable-FirewallRule cmdlet is used
  • A COM object is accessed and/or updated
  • The Set-WsmanQuickConfig cmdlet is used
  • The Get-WsmanInstance cmdlet is used
  • The Add-WindowsFeature cmdlet is used

Idempotency:

Notice that the Script Resource implements PowerShell script logic (via ‘TestScript’) in order to make the resource follow idempotent best practices (most of the other resources manage this for you). The logic implemented in the Script Resource is a reasonable attempt to determine if action is necessary, while not covering every possible permutation that might exist for a misconfigured server. Also notice how either $true or $false is passed back to the resource from the test logic. And finally, the ‘SetScript’ block is not executed unless ‘$false’ is returned by the ‘TestScript’ logic.

Enjoy!

Configuring Windows with Chef and the PowerShell Resource

The PowerShell Resource in Chef is very powerful and versatile for configuring Windows. It essentially exposes all of the power of PowerShell to Chef. And since in PowerShell v.4, most Server Manager functionality is exposed via PowerShell cmdlets, there isn’t a lot you can’t configure in Windows with PowerShell.

The following recipe demonstrates some of the server configuration functionality via Chef’s PowerShell resource by performing the following actions:

  1. Timestamp: A Windows Event is created and an environmental variable is updated to show the last time this recipe was executed on the server.
  2. Enable Remote Desktop: The Remote Desktop (RDP) functionality is enabled.
  3. Disable Windows Updates: Windows automatic updates are disabled (use with caution – unless you have another update process, don’t do this).
  4. Enable Windows Remote Management: The Windows Remote Management functionality is enabled.
  5. Install IIS: The Application Server and Web Server roles are installed and enabled.

Chef Recipe:

# Leaves a timestamp indicating the last time this recipe was run on the node (this resource in intentionally not idempotent)
powershell_script "leave-timestamp" do
  code <<-EOH
    $currentTime = Get-Date
    $currentTimeString = $currentTime.ToUniversalTime().ToString()
    [Environment]::SetEnvironmentVariable("ChefClientRun","Last Chef-Client run (UTC): $currentTimeString","Machine")
    eventcreate /t INFORMATION /ID 1 /L APPLICATION /SO "Chef-Client" /D "Last Chef-Client run (UTC): $currentTimeString"
  EOH
end
 
# Enables remote desktop access to the server
powershell_script "enable-remote-desktop" do
  guard_interpreter :powershell_script
  code <<-EOH
    Set-ItemProperty -Path 'HKLM:\\System\\CurrentControlSet\\Control\\Terminal Server' -name "fDenyTSConnections" -Value 0
    Enable-NetFirewallRule -DisplayGroup "Remote Desktop"
    Set-ItemProperty -Path 'HKLM:\\System\\CurrentControlSet\\Control\\Terminal Server\\WinStations\\RDP-Tcp' -name "UserAuthentication" -Value 1
    eventcreate /t INFORMATION /ID 2 /L APPLICATION /SO "Chef-Client" /D "Enabled Remote Desktop access"
  EOH
  only_if <<-EOH
    if ((Get-ItemProperty -Path 'HKLM:\\System\\CurrentControlSet\\Control\\Terminal Server').fDenyTSConnections -ne "0") {
      $true
    } elseif ((Get-NetFirewallRule -Name "RemoteDesktop-UserMode-In-TCP").Enabled -ne "True") {
      $true
    } elseif ((Get-ItemProperty -Path 'HKLM:\\System\\CurrentControlSet\\Control\\Terminal Server\\WinStations\\RDP-Tcp').UserAuthentication -ne "1") {
      $true
    } else {
      $false
    }
  EOH
end
 
# Disables checking for updates
powershell_script "disable-update-checking" do
  guard_interpreter :powershell_script
  code <<-EOH
    $WUSettings = (New-Object -com "Microsoft.Update.AutoUpdate").Settings
    $WUSettings.NotificationLevel = 1
    $WUSettings.save()
    eventcreate /t INFORMATION /ID 3 /L APPLICATION /SO "Chef-Client" /D "Disabled Checking for Updates"
  EOH
  only_if <<-EOH
    $WUSettings = (New-Object -com "Microsoft.Update.AutoUpdate").Settings
    if ($WUSettings.NotificationLevel -ne "1") {
      $true
    } else {
      $false
    }
  EOH
end
 
# Verifies Windows Remote Management is Configured or Configures it
powershell_script "check-winrm" do
  guard_interpreter :powershell_script
  code <<-EOH
    Set-WSManQuickConfig -Force -SkipNetworkProfileCheck
    eventcreate /t INFORMATION /ID 4 /L APPLICATION /SO "Chef-Client" /D "Enabled Windows Remote Management"
  EOH
  not_if <<-EOH
    # $wsmanOutput isn't used here, just a placeholder for possible use in the future
    try {
      # Use to remove a listener for testing
      # Remove-WSManInstance winrm/config/Listener -selectorset @{Address="*";Transport="http"
      $wsmanOutput = Get-WsmanInstance winrm/config/listener -selectorset @{Address="*";Transport="http"}
      $true
    } catch {
      $wsmanOutput = "WinRM doesn't seem to be configured or enabled."
      $false
    }
  EOH
end
 
# Installs the Application-Server Role
powershell_script "install-application-server" do
  guard_interpreter :powershell_script
  code <<-EOH
    $installResult = Add-WindowsFeature Application-Server,AS-Web-Support
    foreach ($result in $installResult) {
      if ($result.RestartNeeded -eq "Yes") {
        eventcreate /t INFORMATION /ID 5 /L APPLICATION /SO "Chef-Client" /D "Restart is required."
      }
    }
    eventcreate /t INFORMATION /ID 6 /L APPLICATION /SO "Chef-Client" /D "Installed Role: Applicaiton-Server"
  EOH
  not_if <<-EOH
    if ((Get-WindowsFeature -Name Application-Server).Installed) {
      $true
    } else {
      $false
    }
  EOH
 end
Your output should look something like this (although I ran this with Test-Kitchen rather than ‘chef-client’ directly):

Note: The check-winrm script did not execute because it was already configured on the node (server).

Chef-PowerShell-1

New Windows Events should be logged to the configured node (server):

Chef-PowerShell-2

And the following web page should be viewable on the node (server):

Chef-PowerShell-3

The following practices are leveraged in this recipe:

  • A time stamp is logged on the server in order to track every time the recipe is executed. This might be helpful for troubleshooting issues by correlating with the recipe execution timestamp.
  • A Windows Event is logged every time a resource is executed on the server. Event IDs are unique to the resource function.
  • All resources (except the timestamp resource) are idempotent. In other words, logic is in place to insure the resource is not executed if it doesn’t need to be. For example, if IIS has already been installed, then there should be no attempt to install it again. This is a ‘best practice’ for writing recipes.

The following PowerShell functionality is exercised by this recipe:

  • An Environmental Variable is created/updated
  • Events are created with the ‘eventcreate’ command. The PowerShell ‘New-Event’ is not used because for Windows Server (not client) you need to register your custom event source with the server, so ‘eventcreate’ is simpler.
  • A Registry Key is added/updated
  • The Enable-FirewallRule cmdlet is used
  •  A COM object is accessed and/or updated
  • The Set-WsmanQuickConfig cmdlet is used
  • The Get-WsmanInstance cmdlet is used
  • The Add-WindowsFeature cmdlet is used

Idempotency:

Notice that nearly all the resources implement PowerShell script logic in order to make their resources follow idempotent best practices. The logic implemented is a reasonable attempt to determine if action is necessary, while not covering every possible permutation that might exist for a misconfigured server. Also notice how either $true or $false is passed back to the resource. Both conditions need to be addressed by the Guard. Also notice where ‘not_if’ and ‘only_if’ are used.

Enjoy!

Trigger a PowerShell Script from a Windows Event

Note: Portions of this blog are taken from an old blog post titled “Reference the Event That Triggered Your Task”

This example will demonstrate both how to trigger ﴾launch﴿ a PowerShell script from a specific Windows Event, AND pass parameters to the PowerShell script from the Windows Event that triggered the script. For the purpose of this example, a test event will be generated using the built‐in EventCreate command‐line utility.

Background: The scenario behind this example was a need to clean up a file‐share after a specific Windows Event occurred. A specific Windows Event was logged upon the success of a file watermarking process. The event used in this example loosely follows the original event format.

The following steps will be demonstrated:

  1. Manually create the trigger event.
  2. Use Event Viewer to create an event triggered task from the above event.
  3. Modify the task to expose event details to the downstream script.
  4. Implement the PowerShell script to be triggered.
  5. Verify the setup.

Step 1: Create the trigger event using EventCreate ﴾it’s easier to go this route to generate a Scheduled Task for modification rather than trying to create one from scratch﴿. From the command prompt run:

eventcreate /T INFORMATION /SO SomeApplication /ID 1000 /L APPLICATION /D "<Params><Timestamp>2011-08-29T21:24:03Z</Timestamp><InputFile>C:\temp\Some Test File.txt</InputFile><Result>Success</Result></Params>"

Step 2: Use the Event Viewer “Attach Task to This Event…” feature to create the task.

Launch “Event Viewer” and find the event you created in Step 1. It should be located toward the top of the “Windows Logs\Application” Log. Once found, right‐click on the event and select “Attach Task to This Event…” then use the defaults for the first couple screens of the wizard.

PS-Trigger-1

Create a task to “Start a Program” with the following parameters:

  • Program/script: PowerShell.exe
  • Add arguments: .\TriggerScript.ps1 -eventRecordID $(eventRecordID) -eventChannel $(eventChannel)
  • Start in ﴾you might need to create this directory or alter the steps to use a directory of your choice﴿: c:\temp

PS-Trigger-2

Step 3: Modify the task to expose details about the trigger event and pass them to the PowerShell script

From within Task Scheduler, export the newly created task ﴾as an XML file﴿. Right‐click on the task “Application_SomeApplication_1000” in the “Event Viewer Tasks” folder, and select “Export…”.

PS-Trigger-3

Use Notepad ﴾or your text editor of choice ‐keep in mind the text editor must honor unicode which notepad does﴿ to add the Event parameters you which to pass along to your task. The event parameters below are the most useful for event identification. Notice the entire node

<ValueQueries>
     <Value name="eventChannel">Event/System/Channel</Value>
     <Value name="eventRecordID">Event/System/EventRecordID</Value>
     <Value name="eventSeverity">Event/System/Level</Value>
</ValueQueries>

See below:

PS-Trigger-5

From an Elevated Command Prompt, execute the following commands to delete the Trigger Task and recreate it with the newly modified exported Trigger Task ﴾I don’t believe there’s a way to modify an existing task using an updated XML file﴿. From a command prompt, run:

schtasks /delete /TN "Event Viewer Tasks\Application_SomeApplication_1000"
schtasks /create /TN "Event Viewer Tasks\Application_SomeApplication_1000" /XML Application_SomeApplication_1000.xml

Step 4: Implement the PowerShell script to be triggered by creating a script called “TriggerScript.ps1” below

Note: The script below is passed basic information about the event that triggered it. The script then queries the Windows Event Log to get more details about the event (the event payload). For this example, XML is used in the payload to separate the parameters, but any text can be passed as long as the script knows how to parse it. In addition, the “eventRecordID” that’s passed to the script should not be confused with the eventID of the event. The eventRecordID is a sequential number assigned to all events as they are logged to a specific channel. In addition, eventRecordIDs are only unique for a specific Channel (Log).

# Script Name: TriggerScript.ps1
# Usage Example (use a valid ID found via Event Viewer XML view of an event): powershell .\TriggerScript.ps1 eventRecordID 1 eventChannel Application
#
# Create a fake event for testing with the following command (from an elevated command prompt):
# eventcreate /T INFORMATION /SO SomeApplication /ID 1000 /L APPLICATION /D "<Params><Timestamp>20110829T21:24:03Z</Timestamp><InputFile>C:\temp\Some Test File.txt</InputFile><Result>Success</Result></Params>"
# Collects all named paramters (all others end up in $Args)
param($eventRecordID,$eventChannel)
$event = get-winevent -LogName $eventChannel -FilterXPath "<QueryList><Query Id='0' Path='$eventChannel'><Select Path='$eventChannel'>*[System [(EventRecordID=$eventRecordID)]]</Select></Query></QueryList>"
[xml]$eventParams = $event.Message
if ($eventParams.Params.TimeStamp) {
  [datetime]$eventTimestamp = $eventParams.Params.TimeStamp
  $eventFile = $eventParams.Params.InputFile

  $popupObject = new-object -comobject wscript.shell
  $popupObject.popup("RecordID: " + $eventRecordID + ", Channel: " + $eventChannel + ", Event Timestamp: " + $eventTimestamp + ", File: " + $eventFile)
}

Note: Besides executing a script, a task can display a popup directly or send an email. An email can be useful for catching infrequent events on your system or in your environment. And a task can be deployed via Group Policy Preferences.

Step 5: Verify the setup by generating another trigger event as in Step 1

eventcreate /T INFORMATION /SO SomeApplication /ID 1000 /L APPLICATION /D "<Params><Timestamp>2011-08-29T21:24:03Z</Timestamp><InputFile>C:\temp\Some Test File.txt</InputFile><Result>Success</Result></Params>"

You should see the following Popup window appear ﴾it might be hidden behind other Windows﴿:

PS-Trigger-4

Enjoy!